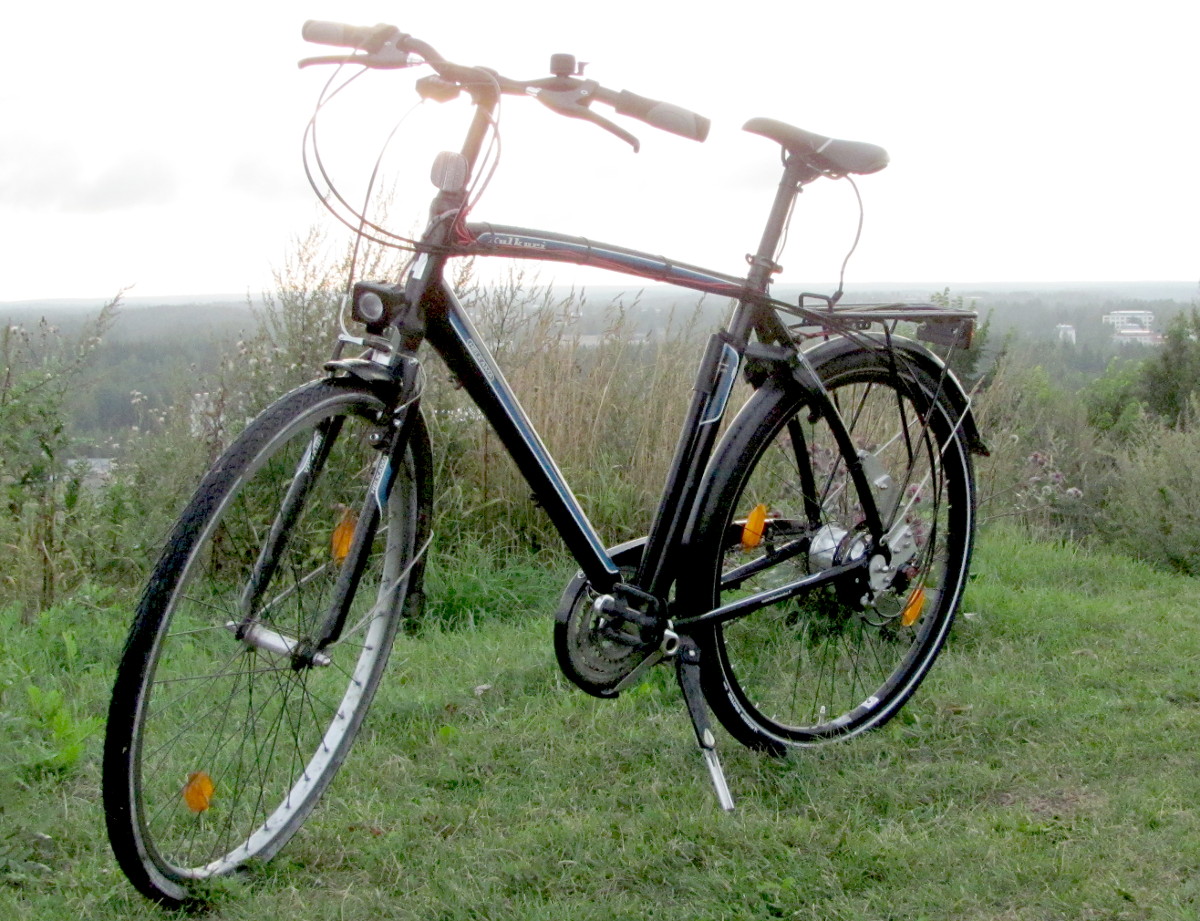
 I have a boring, off-the-shelf, "supermarket" Helkama
Kulkuri bicycle that originally came with the common
Shimano
Nexus Inter 7 hub. It's just a bicycle—nothing to
customize, nothing to upgrade, no options, nothing. Just a plain old
boring bicycle.
I have a boring, off-the-shelf, "supermarket" Helkama
Kulkuri bicycle that originally came with the common
Shimano
Nexus Inter 7 hub. It's just a bicycle—nothing to
customize, nothing to upgrade, no options, nothing. Just a plain old
boring bicycle.
I have a boring, off-the-shelf, "supermarket" Helkama
Kulkuri bicycle that originally came with the common
Shimano
Nexus Inter 7 hub. It's just a bicycle—nothing to
customize, nothing to upgrade, no options, nothing. Just a plain old
boring bicycle.
Since the bike came with an internal pedal-operated coaster brake in the hub, it has no V-brake or disc brake attachment points!
I have pedalled a lot with the Nexus hub that this bicycle came with (as did the one before it), but after buying the new bicycle (my old one was ancient, rusted, and actually growing algae all over the frame, and needed all kinds of service... but it had the exact same hub) I began wishing for a Rohloff Speedhub, which seems to be considered the Rolls Royce of bicycle gear hubs. It has fourteen equally spaced gears with an overall gear range of more than twice that of the Nexus (526% as opposed to 244%) and is renowned to be high quality and reliable. But the conversion of this Helkama Kulkuri from Shimano Nexus to Rohloff Speedhub turned out to be quite a task!
Here's a brief account of my Speedhub conversion, including
The Speedhub
The Speedhub is made in a variety of different configurations, so at
least one of them should fit any given bicycle (uhh... keep
reading). I chose the Speedhub 500/14 TS DB model, which has
mounting points for a brake disc (see the section on
brakes), an external gear mechanism (the disc brake
option isn't available at all with an internal gear mech, but the external
gear mech also makes cable replacement much easier),
and no quick-release (a quick-release would only make stealing it
easier). The final options were color (I chose silver, so it won't stand
out from the multitude of Shimanos as anything worth
stealing; black and red are also available for those who want to
stand out) and number of spokes (I chose 36 spokes, which is the same I
had on the Nexus as well as my front wheel; 32 is also available).
My rear wheel was built by Siegfried from Bike Station, comprising the following parts:
|
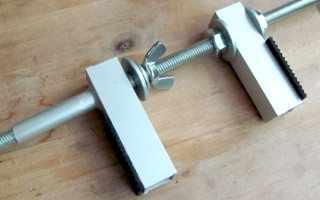
The Speedhub is a few mm wider on its axle than the Nexus. I never thought that would be a problem, but the bike's aluminum frame is just stiff enough to make installation of the wheel a pain. So I whipped up a spreader tool from scraps I had lying about (a threaded rod, some washers and nuts, a few pieces of aluminum tubing and some rubber sheet). The wheel is placed on the dropouts, then the spreader is inserted between its spokes and placed against the insides of the chain stays. Now it only takes a few twists of the wing nut to spread the dropouts apart enough so that the axle falls into place. |
After much deliberation, however, I decided to get my chainring replaced with a larger one. I could have gotten a very reasonable range of gears even with my original chainring, but that would have required the very smallest available sprocket with 13 teeth. No further adjustment to the gear range would have been possible (as there are no smaller sprockets for the Speedhub). So I decided instead to stick with the standard 16 tooth sprocket and have the chainring exchanged for a larger one. This also let me specify the correct chainline for the new hub, as well as switch to the preferred chain size. (Also, a nearby bike workshop charged next to nothing for exchanging a good condition second-hand crankset from a scrapped mountain bike. I'm using only the largest chainring, but saw no reason to remove the two smaller ones.)
With a 48 tooth chainring and the standard 16 tooth sprocket, I get two gears that are higher than the high gear of my old Nexus, and all of four gears that are lower than my old low gear. That seemed like a good combination to start with, let's see what it feels like in practice.
Brakes
If only Rohloff made the Speedhub with an internal
coaster
brake!
Then it would be a true drop-in replacement for other internal gear hubs,
such as the Nexus. But noooooo, the Speedhub has no coaster
brake. I don't know if it's technically infeasible, or if they're just
targetting the
derailleur
gear crowd, who never had coaster brakes in the first place. They make a
lot of points why hand-operated brakes are considered "better"
than a pedal-operated coaster brake, but in the end it's a matter of
preference—and I would have preferred a coaster brake.
Hello Rohloff, any chance of getting a coaster brake version of the
Speedhub??? Please??? Pretty please???
So I had to convert the rear brake as well, which turned out to be the bigger issue in this whole conversion. Now, I would have thought modern manufacturing would prefer generic fit-everything parts e.g. bicycle frames that would have fittings for V-brakes and/or disc brakes even when sold with coaster brakes as standard, but noooooo. There's a V-brake in the front fork, but there's no fittings for rear wheel V-brakes! Honestly! The bike frame is so optimized around the Shimano Nexus and its internal coaster brake, that there are no rear V-brake fittings!!! What to do...
|
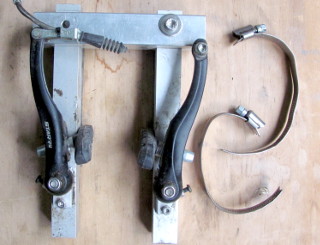
Plan A: I made an attempt to build suitable V-brake
fittings on a DIY add-on bracket. I made it out of square-profile aluminum
tube, which I thought should be rigid enough. I bolted the bracket onto the
bicycle frame with hose clamps, attached the cable, adjusted the brake pads,
and found out the whole thing just flexes too much to work. Two
evenings were wasted on that construction effort. My friend Mario later informed me that ready V-brake add-ons are, in fact, available (e.g. here or here). I thought they must be, but could not find any at the time! I wonder if these are actually rigid enough to work properly? |
|
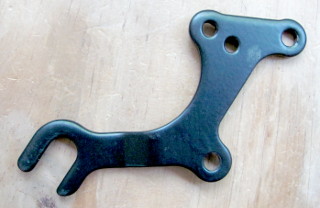
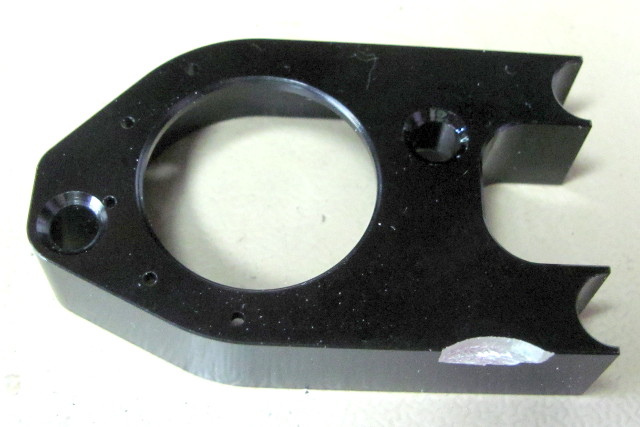
Plan B: I found this beautiful product on eBay
("bike disc brake bracket frame adaptor" were the magical search
keywords). It's supposed to bolt onto the bicycle frame between the rear
wheel dropouts and the rear hub, and is held in place by the rear axle
nuts. The axle sits inside the slot on the left. It also clamps onto the
chain stay or seat stay to provide torque for braking (a clamp is included,
which attaches to the two holes near the top, the ones close together).
The remaining two holes in the protrusions on the right-hand edge are the
IS attachment points. The IS adapter attaches to those, and the brake
caliper attaches to that. However, the chain stays and seat stays were too chubby on my bike, and the adapter could not be attached without extra spacers between it and the dropouts. Maybe that could have been accommodated, but kludge upon kludge just didn't seem like the way to go. Anyway, the axle is only of finite length—this adapter plus the extra spacers would hardly leave room for the axle nut! Also, the slight "twist" in the adapter's body takes the IS attachment points (which are at the correct distances from the axle) too far outwards! I think this is a design flaw—made completely flat, this thing might actually be compliant with the IS standard, but as it is, some extra spacer would be required between this thing and the IS adapter. This is getting worse by the minute! The twist is almost big enough to mount the thing on the outside of the dropout, but then the twist would need to be inwards, and no, it cannot simply be inverted. |
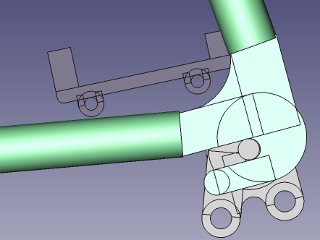
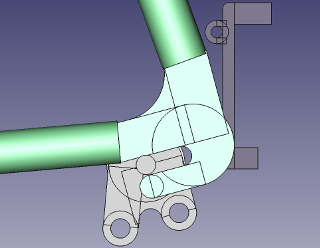
Plan C: Build my own custom disc brake adapter / torque arm combo! (Yes, I really wanted that Speedhub!)
The custom adapter would essentially replace the original "Long torque arm" of the Speedhub. Like the torque arm, it would be attached to the hub's axle plate and to the bicycle frame, but it would also provide IS standard mounting holes for a brake caliper. When moving the wheel forward or back to adjust chain tension, the adapter would move as well, thus keeping the brake disc and caliper properly aligned together. To start the design, I made a rudimentary CAD model of my bike's rear dropout (green), as well as the axle plate (light gray) and IS adapter (dark gray). The model is hardly accurate, but close enough to test positioning the IS adapter relative to the axle (the standard specifies the distances from the axle to both IS holes) in various orientations. As it turns out, the two best options had to be scrapped:
|
Option 1: No go. This is where the IS mounting holes are quite commonly found on a bike that has them, and where I would have liked to put mine. However, when the rear wheel is mounted at the very back of the horizontal dropouts (as it is drawn here), there just isn't enough room for the IS adapter, let alone for the brake caliper itself. The purpose of horizontal dropouts is to enable adjustment of chain tension (by moving the entire wheel forward or back) without having to use a "chain tensioner", which is standard equipment on a derailleur, but seems pointless on an internally geared hub. (One is available for the Speedhub, but I did not want it.) To maintain the brake caliper at the correct position relative to the brake disc, the caliper must also move with the wheel. Thus there has to be room for the caliper and the IS adapter in all positions along the dropout! |
|
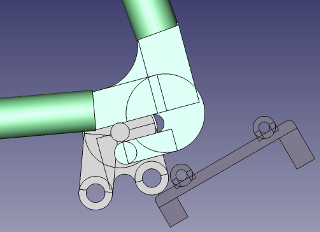
Option 2: No go. Behind the seat stay would be another nice alternative, but now, when the wheel is mounted at the very front of the dropouts (as it is drawn here), there is again no room. Damn. But I still did not want to forgo the chain tension adjustment. The axle plate, by the way, can be freely positioned in any orientation around the axle. I've just placed it in the same position in all these pictures, but if the IS adapter could have gone behind the seat stay, then that's probably where I'd have placed the torque arm as well, and I would have oriented the two big mounting holes on the axle plate correspondingly. |
|
Option 3: Sub-optimal, but feasible. In order to keep the chain tensioning option, the only place I could mount the IS adapter was here, in a slightly awkward position, perhaps a bit less stable, and a bit more susceptible to mud. Not optimal, but overall bearable. The torque arm will attach to the chain stay, forward of the mounting plate, just like Rohloff's original torque arm—or so I thought. |

|
As it turns out, the external gear mechanism made things even more
difficult. Once I put the rear wheel in place, it became apparent that the
mechanism won't fit anywhere else except forward of the axle plate.
The wheel cannot be physically maneuvered into such a position that
the mechanism would be between the chain stay and seat stay—and also
the external cable box would not fit there. And of course the mechanism is
just too short to position it behind the dropout, if I still
want to be able to adjust chain tension. This is why Rohloff
recommends the internal gear mech for horizontal
dropouts—but that is not available with the disc brake option,
which I crucially needed (no rim brake attachment points on the
frame)! Even in this configuration, it's a really tight fit. I actually had to grind a small slot into the external cable box to make it fit—the edge of the axle plate (around the forward hole) just gets in the way by about 1 mm! (Note to the Rohloff engineer in charge of warranty issues: You never saw this web page! Let me buy you a beer instead.) Now that the gear mech is in the way, I cannot anchor torque forward to the chain stay as I intended. Instead, I'll have to anchor it to the seat stay from behind, leaving enough room behind the dropout for chain tension adjustment... This is going to be ugly! I was almost ready to forgo the chain tension adjustment, order the chain tensioner, mount the wheel all the way back in the horizontal dropout, and place the external gear mech behind it. But a chain tensioner in a non-derailleur gear system is just silly. |
|
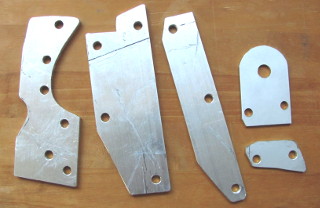
I made most of my custom parts out of 5 mm thick aluminum stock. The
main adapter part (on the left in the photo) attaches with two bolts onto the
axle plate on the "wrong" side, i.e. on the outside
(the instructions say to bolt the original torque arm on the inside).
This places its inner surface in the same plane as the inner surface of the
dropout. Therefore the IS adapter can be bolted straight onto it (with
another two bolts), and it will be at the correct distance from the brake
disc. The final two holes are for bolting on the next part of the torque
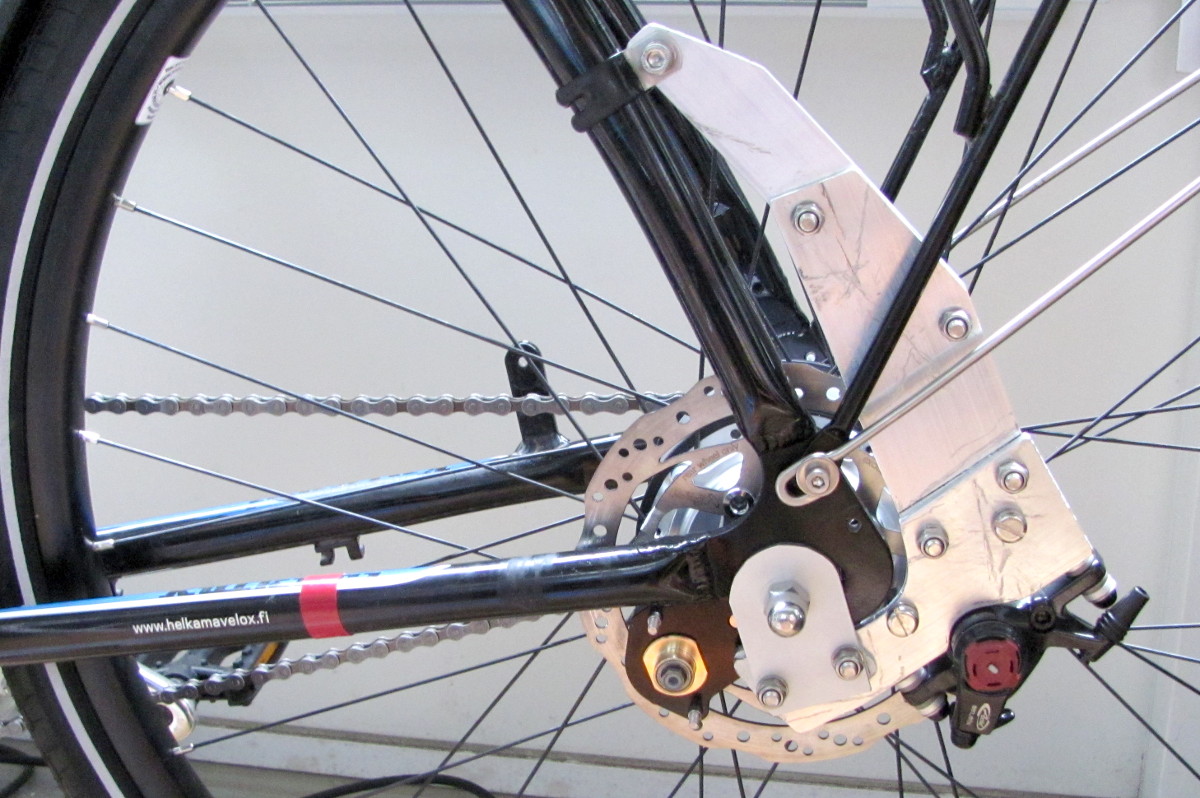
arm. The adapter is attached to the axle plate with M6 countersunk bolts. Their heads are wide enough not to go through the 10 mm openings in the axle plate, and the taper of the countersunk head centers the bolt nicely. The corresponding holes in the adapter are, of course, 6 mm. I also made an extra plate of 3 mm aluminum (right top in the photo) to go on the outside of the dropout, just to give some extra support and stability. It has a 10 mm hole for the axle, and 6 mm holes for the two bolts. There's also a 3 mm thick spacer (right bottom), because my main adapter part is only 5 mm thick, whereas the dropout is 7 mm thick. The spacer is intentionally 1 mm too thick—this makes chain tension adjustment smoother, and the plate on top will bend easily enough when the axle nut is tightened. That, and a pair of M6 locking nuts, secure everything together. To tighten the two bolts, I can just wiggle an Allen (hex) wrench through the openings in the brake disc. Slotted or Phillips screws would have been bad. The other two parts (middle in the photo) make up the torque arm, which reaches behind the dropout to attach to the seat stay. |
|
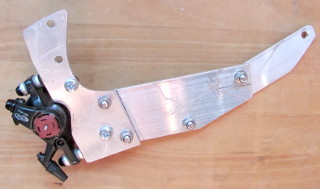
This photo shows the whole deal—adapter and torque arm—fully
assembled, with the disc brake caliper attached. (The caliper is just for
demonstration, it has to come off again before attaching to the bicycle.
Also, the two rightmost parts in the above picture are not included.)
The two unused holes near the caliper are where it attaches to the axle
plate (and where those two missing parts go), and the single hole at the
end of the torque arm is for the clamp I placed on the seat stay. The seat stays curve slightly inward when moving away from the wheel axle, as do the chain stays as well. That's quite typical. The original torque arm is made of 3 mm aluminum and is riddled with holes, and it is designed to bend inwards to clamp onto the chain stay. Since these 5 mm thick parts are much stiffer, I made the torque arm from several individual sections which, when assembled, place the clamp end of the arm in line with the seat stay without having to bend anything. |
|
Here's the entire assembly attached to the bike (see the
full size image). Ugly as hell,
yes. But with braking concerned, I did not want anything flimsy. Maybe I
did go a bit overboard here, however... :) Note that all parts are
carefully designed not to get in the way when moving the rear wheel back
and forth in the horizontal dropout. In this photo, the wheel is pretty
much at the extreme front position. As the chain wears, the wheel will be
moved backwards to take up the slack. This configuration of gear mech, cable box, axle plate and brake caliper was the only way to get everything to fit. Unfortunately the cables going to the cable box (the cables are not yet installed in this photo, but you can see them here) point in a very stupid direction (down and back), but that's the price I had to pay. I attached them with cable ties to the struts of the luggage carrier. They work just fine. The rest of the installation was simply following the manual. Nothing special to document there. |
 My first impressions of the Rohloff Speedhub are very positive.
The shifter is just a tad stiffer than in the Nexus, but it is
absolutely precise due to the two-cable shifting system, and indexing
happening in the hub. The gear
range is fantastic with the 16 tooth sprocket and 48 tooth
chainring, giving me the higher gears I sometimes wanted and several
gears lower than what I had in the Nexus. And there's none of the
dings and bangs of the Nexus in any gears or while shifting.
I'm not saying the Nexus is bad—I've rode them great distances
with minimal maintenance—but they do feel kind of cheap because,
well, they are cheap. As an example, both Nexuses I've
used featured an often-recurring bang shortly after shifting
downwards from 6th gear to 5th and then applying some force. It was
harmless, but always gave me a fright. The freewheeling noises of the
Speedhub, however, are significantly louder than in the
Nexus, but not really disturbing. I've heard louder (and more
disturbing) noises from some derailleurs! There's also a distinct
"grinding" noise in the lower seven gears, which the Handbook
acknowledges as normal, and promises will go away within 1000 km
of use. I've hardly put 500 km on the hub yet, and it's already
becoming quieter. (My Nexus had a similar "grinding"
noise in first gear, and I swear, that was only getting louder with
use!)
My first impressions of the Rohloff Speedhub are very positive.
The shifter is just a tad stiffer than in the Nexus, but it is
absolutely precise due to the two-cable shifting system, and indexing
happening in the hub. The gear
range is fantastic with the 16 tooth sprocket and 48 tooth
chainring, giving me the higher gears I sometimes wanted and several
gears lower than what I had in the Nexus. And there's none of the
dings and bangs of the Nexus in any gears or while shifting.
I'm not saying the Nexus is bad—I've rode them great distances
with minimal maintenance—but they do feel kind of cheap because,
well, they are cheap. As an example, both Nexuses I've
used featured an often-recurring bang shortly after shifting
downwards from 6th gear to 5th and then applying some force. It was
harmless, but always gave me a fright. The freewheeling noises of the
Speedhub, however, are significantly louder than in the
Nexus, but not really disturbing. I've heard louder (and more
disturbing) noises from some derailleurs! There's also a distinct
"grinding" noise in the lower seven gears, which the Handbook
acknowledges as normal, and promises will go away within 1000 km
of use. I've hardly put 500 km on the hub yet, and it's already
becoming quieter. (My Nexus had a similar "grinding"
noise in first gear, and I swear, that was only getting louder with
use!)My makeshift disc brake attachment also works like a charm, ugly though as it is. The brake works reliably, the torque arm stays in place, there's no wobble or backlash... It just works. This was my biggest concern in the whole project, since brakes are kind of important in a bike. The Avid BB7 MTB brake caliper sits firmly in place and does its job well. However, I do still miss having a pedal-operated coaster brake. Hello Rohloff, any chance of getting a coaster brake version of the Speedhub??? But no way am I switching back to Shimano Nexus regardless! Bicycling is fun again!
One old Shimano influence still remains in my bike: Since I was used to the way the Nexus grip shifter works (turn the grip toward myself for higher gear, away from myself for lower), I intentionally crossed the shifter cables of the Speedhub. Otherwise the Speedhub would work in exactly the opposite direction I was used to. However, now the numbered dial on the shifter is reversed—"14" is now the low gear and "1" is the highest. While riding, I have no idea which gear I'm in! But I seldom care.
The conversion was a real pain, however. I really cannot recommend trying to fit a Speedhub onto a bike without rear brake attachment points! If you have one of those, do yourself a favor, pick up an old derailleur bike frame and use that instead! But as long as the frame does have fittings for rear rim brakes or a disc brake, then everything should be a breeze! (Alternately, if Rohloff were to make a coaster-brake version of the Speedhub —Hello Rohloff???—, that would be a direct drop-in replacement for a Nexus in all scenarios. Is there really no market for that?)
Also the horizontal dropout is somewhat limiting, since (if you want to use it for chain tensioning as intended) the only place to put the external gear mech will be downwards—and that's where you'd want to put the torque arm! So for horizontal dropouts, you'll really want to get the version with the internal gear mechanism. But you can't get that with the disc brake option! So if you want to adapt a Speedhub to a bike with horizontal dropouts, again, make sure the frame has V-brake or other rim brake attachment points!
If you do want to do something stupid like me, out of sheer bloodymindedness, it's not impossible to fit a Speedhub and a disc brake to a frame with no rear brake attachments points. You won't even need a huge variety of tools—I had only a hand-held drill and a jigsaw, plus the usual files and screwdrivers etc. I wish I had a milling machine, or at least a drill press. That would have made everything infinitely easier. But I did end up with the world's finest gearbox in the world's most boring bicycle (which no-one will want to steal, I hope), just the way I like it!
And it's not really even that ugly, now, is it. :)