|
Setting frequencies, modulation and step, and programming
channels
- To manually tune a frequency and program a
channel: First press
"MANUAL" to go into manual mode. Then type a channel
number ("1" to "400")
and press "MANUAL" to go to that channel (Note:
the following steps will overwrite it!). Now type the frequency and
press "E" (Enter) to tune to that frequency and store it.
If it is already programmed into another channel, e.g.
channel 21, the scanner will inform you by saying
"CH 21". If that happens, you can press
"E" again to store another copy of that frequency anyway,
or any other key (for example ".") to cancel.
Any time you decide not to overwrite a channel after all
(e.g. if you pressed some number keys by accident), press
"." twice to cancel. (The "." key
doubles as "CLEAR" when "SHIFT"
is pressed, in case you're wondering why "." of
all keys...)
- To manually tune to a previously programmed
channel: Press "MANUAL" to
switch to manual mode. Then type the channel number and press
"MANUAL" to tune to that channel. To tune to another
channel, type its number and press "MANUAL" again,
or press "MANUAL"
repeatedly to step forward through the channels in numerical order.
- To delete a programmed
channel: Write a frequency of
zero MHz to that channel. As above, first press
"MANUAL", type the channel number, and press
"MANUAL" again to go to that channel.
Then press "0" and "E" to store
a frequency of 0.000 MHz to that channel. The channel is now
"empty" and is also excluded from scans until programmed
again.
- There are no gaps in frequency
coverage: The radio may at first seem to
refuse to program some frequencies, but that's
only due to some crazy 8 MHz frequency steps it defaults to in
some frequency ranges, and rounds all frequencies downwards to the
nearest 8 MHz step. But if you first manually set the frequency step
(see below), then it will accept any
frequency in the 25 MHz – 1300 MHz range.
It took me a while to find this out, and at
first I thought the "Full coverage" claim was an outright
lie...
- To change the frequency step: Press
"SHIFT"–"5 kHz" or
"SHIFT"–"12.5 kHz"
or "SHIFT"–"50 kHz".
Any search you
now perform will use this frequency step, and also any manually
programmed frequencies will be rounded downward to the nearest
step.
- To change the modulation: First
select or program the channel,
then press "SHIFT"–"AM" or
"SHIFT"–"NFM" or
"SHIFT"–"WFM". The new
modulation is immediately taken into use and also stored into the
channel. To go back to the default modulation, press
"SHIFT"–"CLEAR".
- To turn on the priority channel: Press
"PRI" so that the "PRI" indicator on the
display
becomes visible. Now the radio will tune to the selected priority
channel (see below) whenever it becomes active. This works in the
MANUAL and SCAN modes, but not while searching (also the
"PRI" indicator turns off while searching). The priority
channel is checked for activity every two seconds, which causes
a momentary but annoying break while listening to Pink Floyd or other
oldies on broadcast radio...
Press "PRI" again to turn the feature off (the
"PRI" indicator disappears).
- To select the priority channel: Press
"MANUAL"
to switch to manual mode. Then type the number of the channel,
but instead of pressing "MANUAL" to go to that
channel, press "PRI" instead.
A letter "P" will be displayed
on the left-hand side of the display when the priority channel
is selected. There can be only one priority channel at a time.
("There can be only one!!!") I don't know if
there's any way to unselect the priority channel, but when
priority mode is off, it doesn't do anything, so who cares.
Searching
- Direct search: This will start searching
continuously in the current modulation mode with the current frequency
step either upward or downward from the current frequency, with no other
limits. First go to the starting frequency as above. Then
press the SEARCH up-arrow or down-arrow key to start
searching up or down from that frequency. Searching will stop when
an active frequency is found, and will continue when activity ceases, or
when you press up-arrow or down-arrow again.
You can also press "LIMIT" to halt the search at the
current frequency ("HOLD" appears on the display).
While halted, up-arrow and down-arrow will move one step
at a time up or down. Press "LIMIT" again to continue
searching. "
−d−"
blinks on the display during direct search.
- Limit search: Like direct search,
this will
search continuously in the current modulation mode with the current
frequency step, but repetitively between two frequency limits. To set the
limits, press
"MANUAL" to go into manual mode. Type one frequency
limit (yes, frequency, not channel number this time!)
and press "LIMIT". Then
type the other frequency
limit and press "LIMIT" again.
Now press the SEARCH up-arrow or down-arrow key to start
searching upwards or downwards between those two limits. There are no
separately defined upper and lower limits, the search will always
commence between the last two limits entered. When the latter limit is
reached, search will restart from the first limit. In all other respects,
limit search works like direct search (see above).
"
−L−"
blinks on the display during limit search.
- High-speed search: When searching, you can
press "SHIFT"–"SPEED" to switch
to high-speed search (300 steps/sec).
This automatically sets the step to 5 kHz.
- To lock out (skip) frequencies from a
search: When
search stops at an uninteresting frequency (noise or interference),
you can press "L/O" to lock out that frequency from
the search. On the next search round, that frequency will be skipped
and ignored. A total of 50 individual frequencies can be locked out.
Press "SHIFT"–"RVW" (review)
to see the list of locked-out frequencies. Scroll the list with the
up-arrow and down-arrow keys, and press SHIFT to
exit from review mode and continue searching. While in review mode,
press and hold "L/O" for three seconds to remove
all skip frequencies. Removing individual
skip frequencies is quite a bit more involved:
You must be in search mode, then halt the search by pressing
"LIMIT", and go to that
frequency with the up-arrow and down-arrow keys.
The "L/O" indicator is shown to indicate the frequency is
locked out. Press "L/O" to remove the indicator
and include the frequency in future searches.
- To automatically store frequencies in search
mode: Set up a direct search or a limit search
as above, but do not start the search with up-arrow or
down-arrow. Instead, press
"SHIFT"–"AUTO". The bank
numbers on the display's top row begin flashing. Select one or more
banks to store the results into by pressing their corresponding
number keys. Non-flashing bank numbers have been selected.
Completely full banks cannot be selected (the display will say
"FULL"). When ready, press up-arrow or down-arrow
to begin the search. Any new active frequencies that are not yet
stored in some memory will be stored into the selected bank(s).
The search will continue without stopping until all the selected banks
have been filled, at which point the display will read
"End". Or you can stop the search yourself e.g.
by pressing "MANUAL".
Scanning
- To start scanning: Press the
"SCAN" key. All channels (except locked-out ones)
from all active banks are scanned. The active banks are shown on the
top row of the display. The number of the bank currently being scanned
blinks. Press the number keys to activate or disable individual
banks. Scanning will stop at any active channel, and resume when the
activity ceases. You may also press "SCAN" again to
immediately resume scanning.
- Locking out channels: When scanning
stops on an active channel, you can press "L/O to
lock it out. Scanning will immediately resume, and that channel will
be ignored on the following scan rounds. (Note: This is different
from locking out frequencies from a search. This is stored on a
per-channel basis for each of the 400 channels, whereas for
search lock-out up to 50 individual lock-out frequencies can be
defined without affecting any stored channels.)
You can also select a channel
in manual mode and press "L/O" to lock it out from
future scans (the "L/O" indicator appears on the display).
To re-enable a locked-out
channel, select that channel in manual mode (the "L/O"
indicator will be displayed) and press "L/O" (the
"L/O" indicator disappears). To review which channels have
been locked out, in manual mode press
"SHIFT"–"RVW".
Scroll the list with up-arrow
and down-arrow and press "L/O" to re-enable
individual channels. Press "SHIFT" to exit review
mode. To re-enable all channels from selected banks, first go into
scan mode and select all the banks you want to remove lock-outs from.
Then go into manual mode,
and press and hold "L/O" about three seconds.
- To turn on the delay: This causes the
radio to wait either 2 or 4 seconds (see below) before it
continues scanning (or returns from the priority channel) after
transmission stops on that channel.
Manually select the channel and then press
"DLY". The "DLY" indicator appears on the
display. This setting is specific to that channel only, and can be
set separately for all stored channels (including the priority
channel, of course).
- To set the delay: Hold down the
"DLY" key while turning on the scanner. The display will
momentarily read
"
2 SEC" or
"4 SEC", indicating which
delay is now in use. The setting is the same for all channels using
delay, and is remembered over a power cycle.
Other functions
- The display light, attenuator and key
lock: The "LIGHT",
"SHIFT"–"ATT" and
"LOCK" functions work pretty much as expected.
The light stays on
for 15 seconds, or longer if you keep using the keypad.
The switchable attenuator stays on until turned off, even when
changing channels, scanning or searching. It seems to have an
attenuation of
about 12 dB at 25 MHz, about 17 dB at 100 MHz,
and it seems to do nothing at all at 1000 MHz! A good quality
external coaxial attenuator (not a cheap one from eBay)
might be a bit more reliable... The key lock
is enabled and disabled just by pressing the recessed
"LOCK" key with no further tricks.
- The data skip function: If an
unmodulated signal (i.e. silence)
is encountered during search or scan, the data
skip function will cause the search or scan to continue after a few
seconds. This does not seem to work very reliably, i.e. it
has a tendency to continue scanning even if the signal is
modulated. Which actually makes it more useful as an
"index function" (see below).
This works only in the FM and NFM modes, and is enabled with
"SHIFT"–"DATA".
- The keypad beep: Oh boy the beep is
LOUD! But you can disable it by holding down the
"L/O" key
while switching on the scanner. It can be re-enabled
the same way. The display will confirm the setting by momentarily
reading "Off beep" or "On beep".
The setting is remembered even over a power cycle. I just wish
there was several beep volume settings to choose from...
- To reset the scanner to factory
settings: Press
and hold the "MANUAL", "2" and
"9" keys
while switching on the scanner. This will immediately clear all memories
and reset all settings.
- NiMH batteries: Modern NiMH batteries work
just fine in this radio, but they do not like trickle charging
with no delta-V cutoff. Therefore I would not charge NiMH batteries in the
scanner, which was likely designed for NiCd batteries. They probably
won't explode or anything, but they may lose capacity due to overcharging
if left connected for prolonged periods of time (say, weeks). Anyway
getting a full charge will take quite a long time.
When the battery switch (inside the battery compartment)
is set to "REG. ALK. BATT" instead
of "Ni-Cd BATT", I think
the scanner won't try to charge the batteries when on external power.
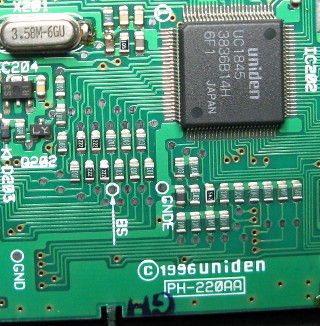
- Data retention: The microcontroller
circuit board inside the scanner has a hefty memory backup capacitor.
This will probably maintain the programmed channels and other settings
for a few days, but not indefinitely. Don't let the batteries die if
you don't want to lose the memory contents.
What's missing? (Please correct me if I'm wrong!)
- Completely manual VFO mode: If you
want to tune to some random frequency, you have to do that by
programming it to some channel. Oh well, big deal, just use
channel 1 for that purpose. You can afford to lose one channel
of 400. But of course that frequency will be included whenever you
scan bank 1. Well, just lock out that channel, ok? Fine, but
whenever you re-use channel 1 to tune to some other random frequency
as a one-off test, the lock-out is automatically removed, so
the random frequency still gets included in your next scan!
- Monitor memories: The PRO-26
and UBC-3000XLT manuals mention something called
"monitor memories". It seems like these are not
available on the COM216.
- Index mode: There doesn't
seem to be an "index mode" i.e. a setting that would make a
search or scan continue after a few seconds of listening to an active
frequency. The radio will just continue listening until the transmission
ends, or until the user commands it to move on. (The "data skip"
function mentioned above could be used instead, but only because it
doesn't really work as intended. It's not really an
"index mode".)
|