
|
There is a lake in Orivesi, Finland, called lake
Äväntäjärvi,
where I've been fishing with my father many, many times. It's not a big lake
by any means, but curiously, there is an almost 50 meters deep
abyss in it! In Finland, that's a really significant depth for a lake by
any standards, not to mention a lake only this size! You know I wanted to
sink a camera into it, to see what nightmare monsters lurk down there,
and the Soviet nuclear submarine!
Rather than trying to make a watertight pressure vessel for a camera, I
reasoned that the camera should withstand the pressure just fine, as long
as it stays dry. And as long as I try not to maintain any pressure
differential between the camera and the lake, there'd be no reason for any
water to ingress.
|

|
I already had a bunch of cheap MD80 "MiniDV" cameras from
eBay, which had flown onboard a couple of rockets.
They were already modified for external control, so a microcontroller could
mimic pressing their POWER and REC buttons, and read their two status LEDs. I
thought I'd destroy them for kicks.
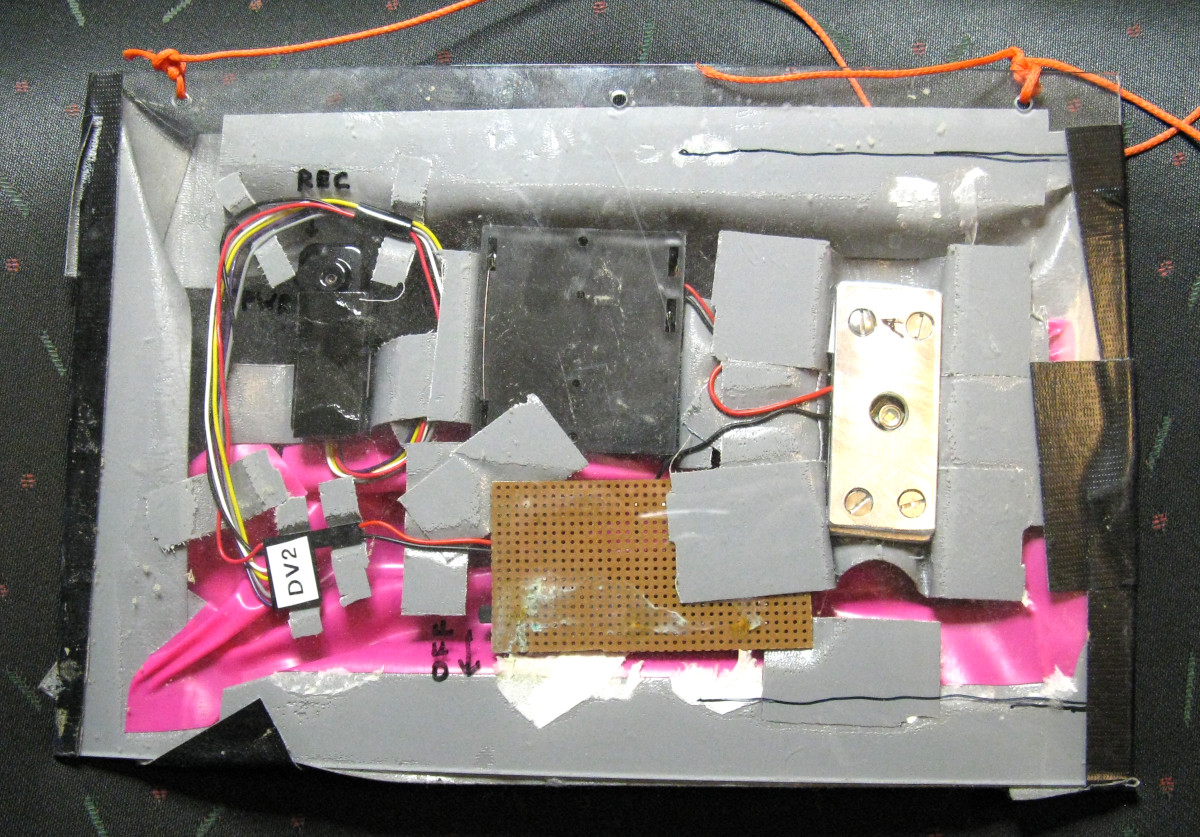
Here's my first attempt, which
did succeed in destroying one. I took a piece of clear acrylic (this photo
is looking at the acrylic side), taped the camera, 4×AA battery holder
and a powerful LED to it, and taped a rubber film on the other side (I used
a section of pink exercise resistance band). Here's
another photo from the
other side. I tried to leave as much air inside as possible by including
bunches of crumpled tissue paper—the air should just compress as the
pressure increases, and the inside pressure should be the same as outside,
right?
After its deep dive, the thing surfaced all waterlogged, with the camera
successfully destroyed. The "Gorilla" tape holding the rubber
film to the acrylic had separated somewhere. The LED was still shining,
and the camera still had power, but it was apparently not recording anymore,
and was totally unresponsive. No video at all could be retrieved from its
micro-SD card, not with my skills anyway.
|

|
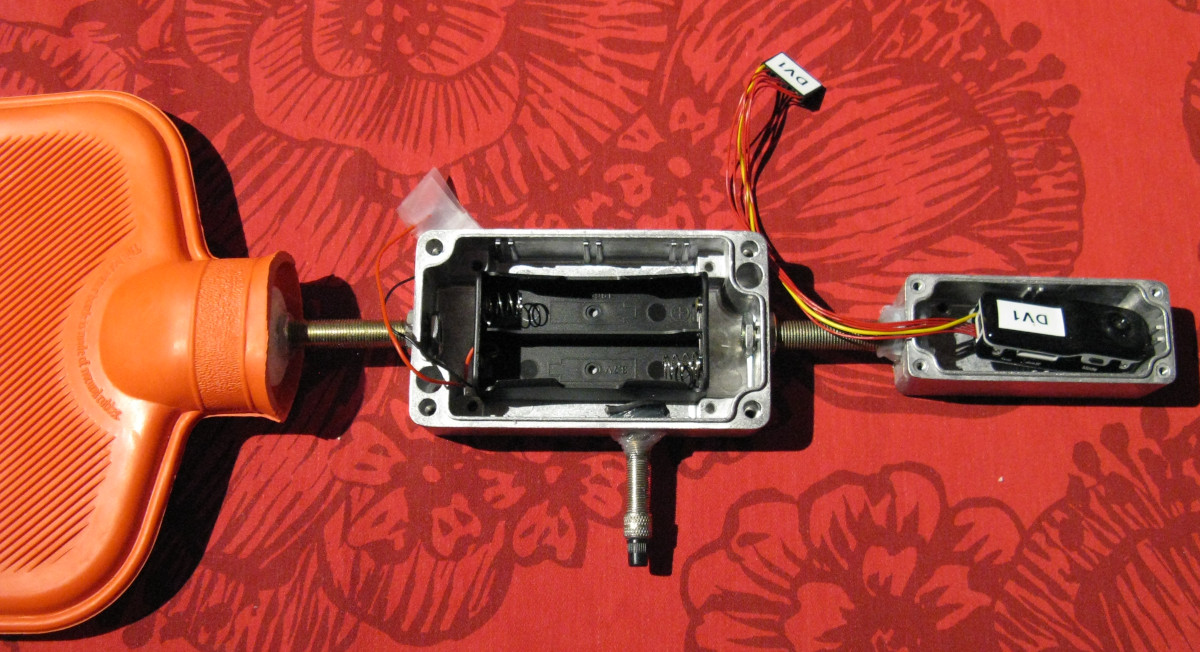
Next I thought of a hot water bottle! With a couple of aluminum project
boxes with rubber gaskets, and some threaded tubes and nuts (they are
used in some lighting fixtures) and silicone caulk to seal everything,
I envisioned a space station like
assembly of modules, connected by tubes. One module would contain the
batteries (four CR123 lithiums in series, which fit in a 2×18650
holder, and should provide 1 A of current for a whole hour, while
maintaining at least 9 V voltage), LEDs and controller. A separate
module would contain the camera (just to separate it somewhat from the
light source), looking out through a hole covered with clear acrylic. The
hot water bottle would provide a compressible air reservoir.
I calculated the total interior volume of the boxes and connecting tubes,
which came out to about 200 ml. At a depth of 50 m, the pressure
is some 5 atm more than at the surface, so I needed some
5×200 ml = 1000 ml of additional air to compress.
The hot water bottle holds 1500 ml when not inflated to stretching,
which gives ample safety margin as well. Some 2 kg of weight will be
needed to sink it. A bit more for safety margin. 2.5 kg looks to be a
standard size for weight lifting weights—perfect!
|
|
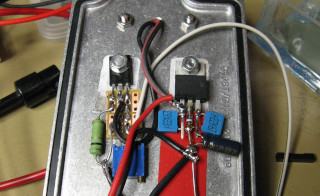
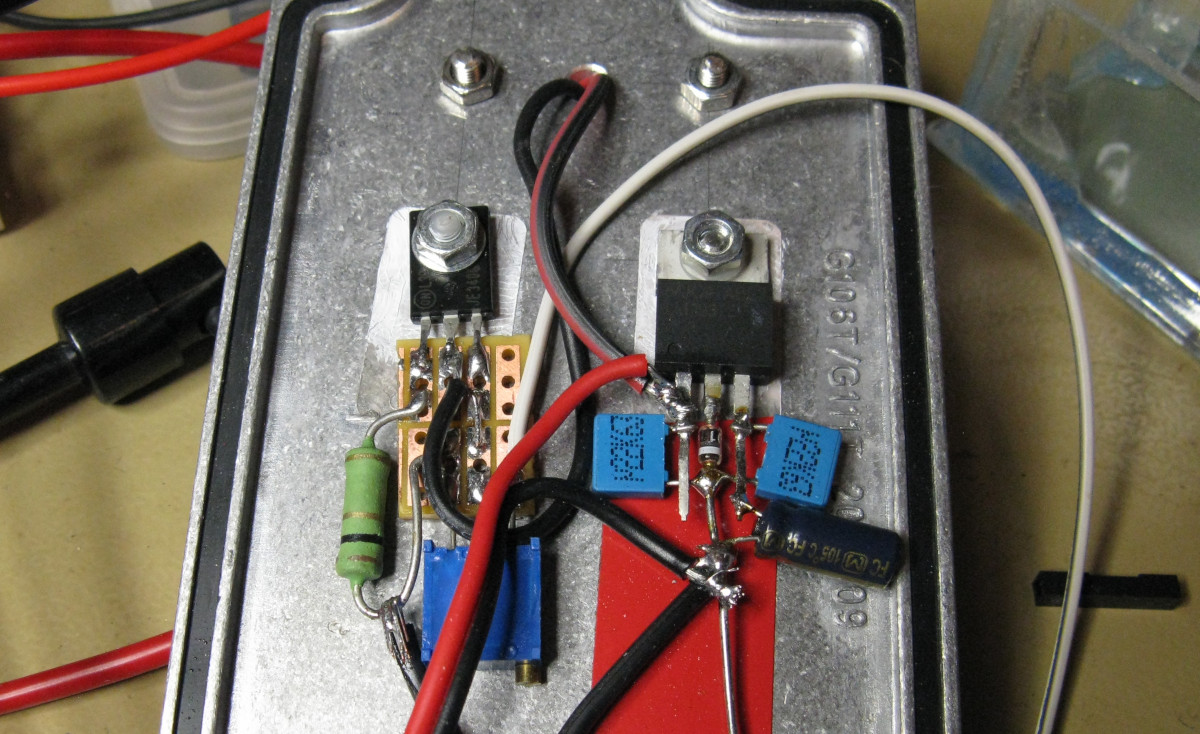
A linear regulator provides power for the camera and its controller, and a
simple single-transistor constant current source powers two 3 W LEDs
in series at 0.5 A (yes, that's below their max specs, but I wanted
to be lenient on the batteries). The regulator and transistor are
mounted on the
project box lid, which acts as a heat sink. One LED is fitted with
an additional lens to spread out its beam somewhat. I just
could not fit the LEDs with their reflectors inside the box, so I
mounted them outside, also using the
same lid as a heat sink, and made an enclosure for them out of acrylic.
This enclosure increases the volume of the system, but I think the hot
water bottle should still just provide enough air to compress. Not
much safety margin left, though.
|
|
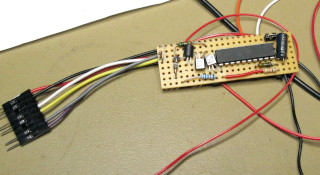
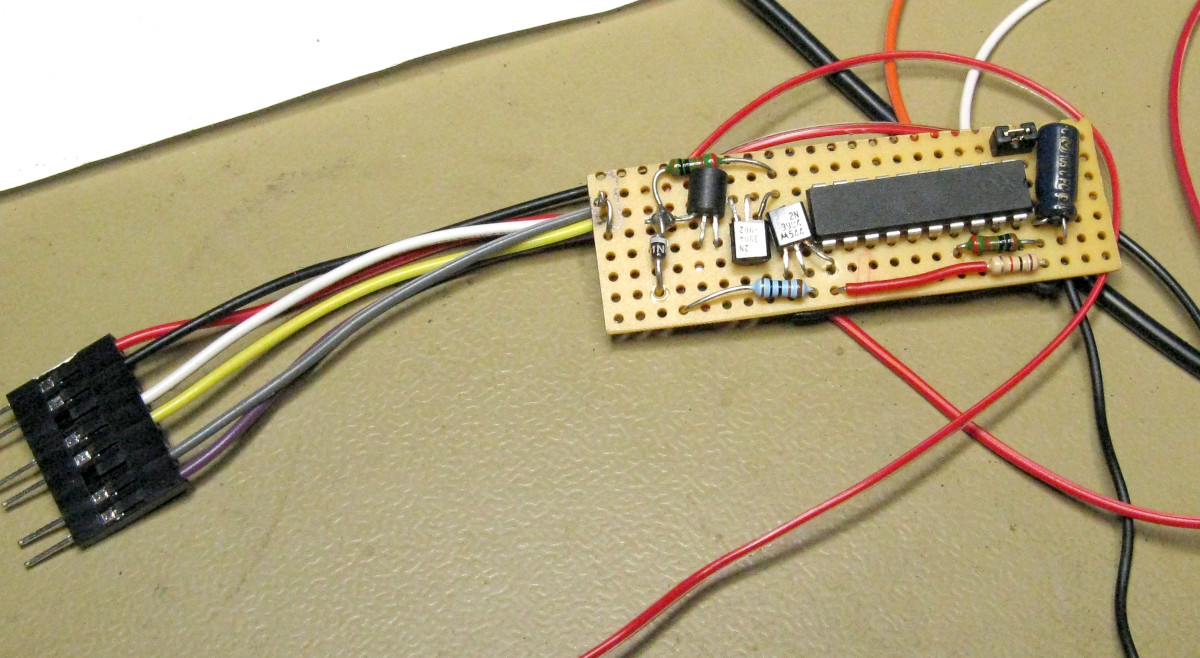
A PIC16F690 microcontroller
controls the illumination and the camera (which was already modified for
external control). The PIC is needlessly big and overpowered for this
purpose, but I just used what I happened to have in shelf. The camera was
originally powered by a single internal LiPo cell, so it likes to run on
3.something V, now provided by the regulator. Happily, the PIC is
also fine with that voltage.
I use a reed switch (actually a reed relay, with its coil not
connected—again, what I had in shelf) to magnetically control the
PIC from outside the box. I power up the thing with a magnet nearby, then
close the lid, pump up the hot water bottle, and when everything's ready,
I remove the magnet to tell the PIC it's time to start shooting. That way
I can prepare everything comfortably indoors, and not have to expose
anything critical to the weather. After the dive, I replace the magnet
to tell the PIC to shut down the camera cleanly.
Just in case something goes wrong during the dive and the camera stops
recording, the PIC monitors the camera's status LEDs and attempts to
restart it, power cycling if necessary. The PIC also stops and restarts
the camera every now and then, so it can write and close the current
video file and start another one. You see, I am expecting this
thing to leak regardless, and to destroy the camera. I just hope the SD
card will contain something that I can recover, hopefully from the
deep end of the dive.
|
|
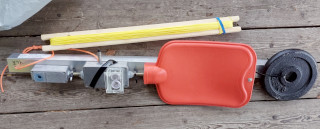
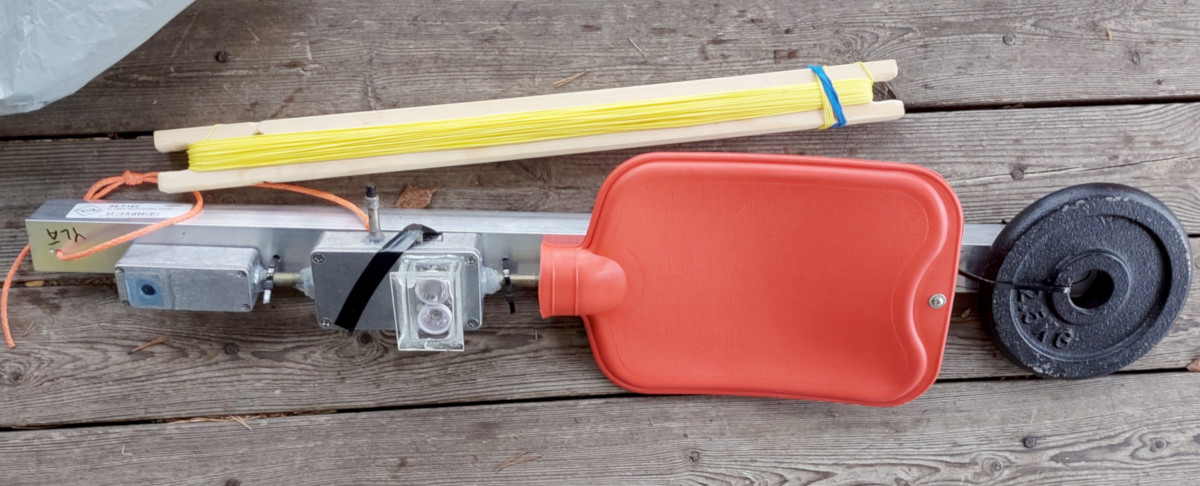
Here's the complete contraption
attached to a length of aluminum profile. It seems stupid to put the buoyant
hot water bottle at the bottom end, and I was initially about to put it at
the top without thinking, but then I realized that the squeezable hot water
bottle will determine the internal pressure of the entire system. Placing it
at the bottom where the hydrostatic pressure is greatest maximizes
that pressure. The other modules will thus have higher internal
pressure than the hydrostatic pressure they experience on the outside!
So if (or when) anything leaks, it should just be air leaking out, rather than
water leaking in! There's a Dunlop-type bicycle tire valve in one of the
boxes, so I can easily fill the hot water bottle with a bicycle pump
before sending it to the deep. I can also over-pressurize it just a tad,
to provide some more safety margin (which I lost because of the LED
compartment issue mentioned above). This valve certainly must be higher
than the hot water bottle, so it won't admit water in!
I cut notches at the ends of a 50 cm piece of wood, and wrapped an
ample amount of cheap Chinese "100 kg test" fishing line
from eBay on it. (I've tested the stuff with an actual pull tester, and it
only stood up to some 50 kg, but still good enough for this use.) One
full turn thus equals one meter down. I already used this with my earlier
attempt, and it at least worked just fine. It was a somehow eerie feeling
finally hitting bottom after unwinding almost 50 m of line!
|
But what do you know, the stupid thing actually worked! I dropped it into
the depths of Äväntä on 2022-10-15, and over half an hour
it actually recorded video as it should, all through the dive! After
surfacing, the camera and battery compartment were both absolutely dry, the
camera was still in working condition, and the SD card contained video shot
at nearly 50 m depth! Nothing very interesting, however—I now
realize the camera and light source should have been angled downward,
instead of looking straight out. Now I mostly caught
brief glimpses of mud kicked up from the bottom, and where the actual
bottom is visible, it's impossible to say even whether it's rock or gravel
or silt. But regardless, these images were captured at a depth of almost
50 meters, using nothing more than a $20 eBay camera and a hot water
bottle! How's that for DIY!!!???
Here's some of the very best frames from maximum depth and from the
steep incline along the way up. Ignore the time stamps, they are bunk,
but cannot be disabled in the cheap camera. In the first frame, something
bright was moving at the lower edge of the picture—could that actually
be a fish or a shrimp, or is it just a dead leaf the camera kicked up from
the mud?
Now that I've seen that the system works, I'll definitely angle the thing
downward, and go for another dive next spring! That time I'll find the
Soviet submarine for sure. Also (note to self!) make sure to trim any
unnecessary ends of line away, so they don't cross the camera's field of
view all the time. A small float on the line, some way up from the
contraption, would also help keep the line out of the camera's way.
Yes, I know diving enclosures are commercially available for Gopro cameras
and whatnot. I know they are rated for at least 40 m depth or whatever.
But this project was all about DIY. But not only that, those
commercial enclosures are pressure vessels which will break or leak when
taken down deep enough. As long as there's enough air available to compress
(add more hot water bottles if necessary), there's no limit to how deep
this thing could go! Of course, the camera will experience the full
hydrostatic pressure of that depth, but (unless something in the optics
is sealed airtight) I don't see why a solid state camera shouldn't survive
simple pressure just fine! Not getting wet is the issue, which can be
resolved either by a sturdy pressure vessel, or as I did, by equalizing the
pressures inside and out.


