<HOME
<Test equipment
<GPIB on Raspberry Pi
GPIB program examples with PyVISA
Having set up GPIB and PyVISA on a Raspberry
Pi, I had to get in at
least some practice with PyVISA and with Python in general. Here's some
minimal utilities I wrote mainly as exercises for myself, but which I
do actually use from time to time. I run these on a headless Raspberry
Pi, which I can either SSH into from my primary desktop PC, or, more
conveniently, I can access most of them from my desktop
through a web browser. These work through
old-school html and cgi-bins, no PHP, Javascript or other newfangled
garbage required. No need even for a dedicated Raspberry Pi; these can
all run on a desktop PC just as well—I just preferred to isolate my
lab equipment from my main PC to their own separate network.
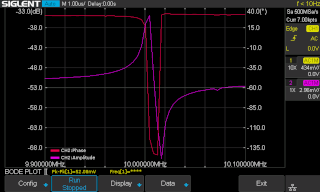
Bode plot on Siglent oscilloscope with non-Siglent signal generator
|
More than just a program example, this was a project unto itself...
(In fact, this is why I started setting up GPIB in the first place.)
See more details on its own page.
The popular SDS 1104X-E oscilloscope by Siglent has a
useful "Bode plot" function, which requires a Siglent AWG
(Arbitrary Waveform Generator) to work. There exist various utilities
to mimic the Siglent AWG with other manufacturers' devices using a
microcontroller or Raspberry Pi to translate
commands and responses between the two. I did the same using my
Agilent E4421B RF signal generator, which is connected via GPIB
(although it does have a serial port as well). The program I made for
this purpose,
sds_pyvisa_bode.py, uses
PyVISA to talk to the RF signal generator, and should in principle work
with any RF signal generator, regardless of manufacturer, as long
as it understands a few standard SCPI commands. And, thanks to PyVISA, it
can be connected via GPIB, serial/RS232, USB/USBTMC or Ethernet/VXI-11!
Read more about the program here!
|
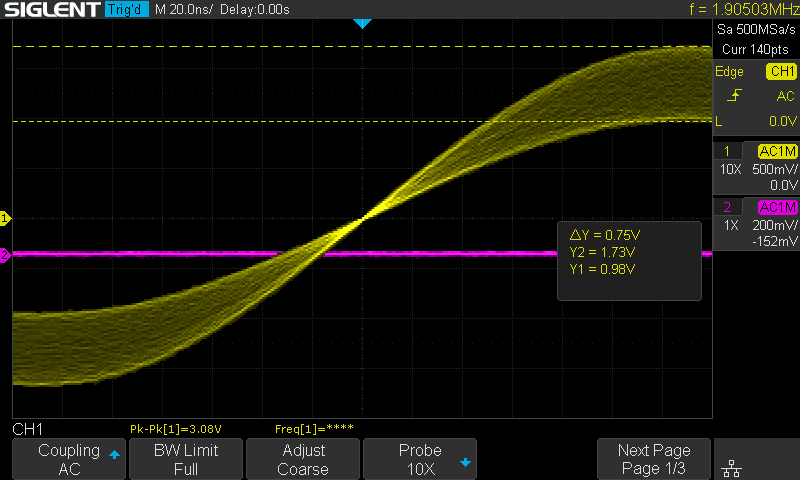
Screenshot from my HP 54501A oscilloscope
|
Just for kicks, I wrote a short python script that will take a screenshot
from my old HP 54501A oscilloscope and store it as a PNG file. I used
PyVISA, although a program this simple could just as easily be done with
just the Gpib.py library. The program is incredibly short, and is shown in
its entirety below. It's not really portable to other instruments (except
maybe other HP oscilloscopes of the same time period), as the output data
format is probably unique to the 54501A and its kin.
Oh yuck the screenshot looks ugly in black and
white—the green monochrome screen of the oscilloscope is much nicer
to look at! :)
|
#!/usr/bin/env python3
addr = "GPIB0::7::INSTR"   #replace the 7 with your scope's GPIB address!
import pyvisa
from PIL import Image
rm = pyvisa.ResourceManager()
instr = rm.open_resource(addr)
instr.write(':PRINT?')
answer = instr.read_raw(30742)
img = Image.frombytes("1", (640, 384), answer[23:])
img = img.crop((0, 0, 595, 384))
img.save("output.png")
Some comments about the code: I had to limit the read operation to
30742 bytes (determined experimentally) in order not to have the scope
complain of "Query UNTERMINATED" as it seemed to do with an
unlimited read. The image conversion starts at an offset of 23 bytes,
as those first bytes are probably commands intended for the HP
printer on the same GPIB interface, instead of actual image data. Also the
right-hand edge of the image is garbage, probably printer commands again,
so that has to be cropped away.
Screenshot from my Siglent SDS 1104X-E oscilloscope

|
The more modern Siglent SDS 1104X-E oscilloscope provides
screenshots directly in a variety of standard image formats. They can
easily be saved to a USB thumb drive, but it's more convenient to grab
them directly over the network. There's a Python script
on Siglent's website
which does just that by messing with sockets and wait times and all kinds
of low-level stuff.
My script below does the same thing: it requests a screenshot over the
network and saves it as a PNG file, and demonstrates how simple
PyVISA makes this operation. Plus, if you were to connect the scope by
USB instead of Ethernet, the low-level Siglent script would absolutely not
work! My script would, if you just change the address to whatever
USB0::something::something::INSTR that the
list_resources() command finds.
|
#!/usr/bin/env python3
address = "TCPIP::10.42.47.104::INSTR"  #use your scope's address!
import pyvisa
from PIL import Image
rm = pyvisa.ResourceManager()
instr = rm.open_resource(address)
instr.write('SCDP')
answer = instr.read_raw()
img = Image.open(io.BytesIO(answer))
img.save('output.png')
Screenshot from my HP 8562B spectrum analyzer
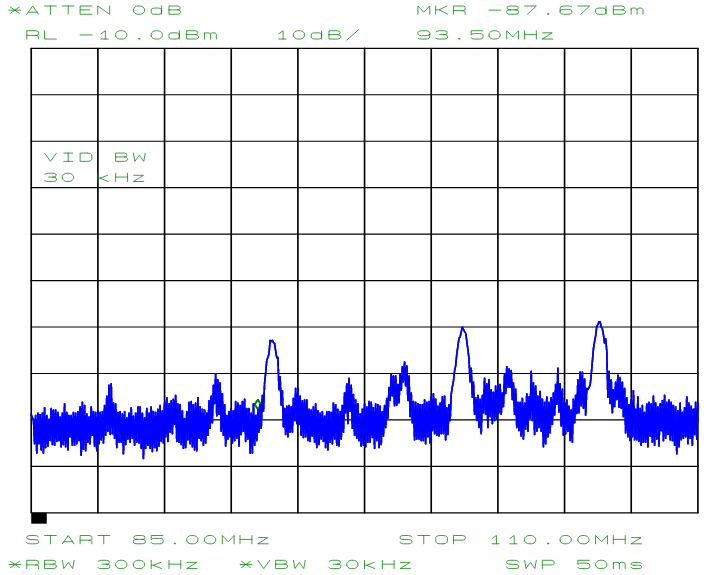
|
Getting a screenshot from my HP 8562B spectrum
analyzer was a bit more involved. Firstly, it would not voluntarily
send the screenshot without extra coaxing (it needs to believe it's talking
to a plotter on the same GPIB bus, but I honestly don't know how this
"coaxing" I did differs from an ordinary GPIB transaction).
Secondly, when it finally gave up its jealously guarded data, it came in
HPGL format! But eventually I was able to convert it to a relatively clean
looking SVG output. Here is a spectrum
of the FM radio band, for example, measured using nothing but a rubber duck
antenna on the input port. (Here the SVG has further been converted to PNG.
The script does not do that automatically.)
The script to get the screenshot and to convert it to SVG vector graphics
(perhaps more common nowadays than HPGL) is shown below. It requires the
python-hpgl
library by Alex Forencich for the image conversion.
|
#!/usr/bin/env python3

GPIB_ADDR = 18   # change to suit your instrument
import pyvisa, hpgl, sys, io
rm=pyvisa.ResourceManager()
instr=rm.open_resource('GPIB0::'+str(GPIB_ADDR)+'::INSTR')
bus=rm.open_resource("GPIB0::INTFC")
instr.write("PLOT")
bus.send_command(bytes([0x3f, 0x20, 0x5f, 0x40+GPIB_ADDR]))
hpgl_data=bus.visalib.buffer_read(bus.session,32000)

# Fix the HPGL fonts, convert to SVG and fix linewidth
hpgl_data=hpgl_data[0].replace(b';SR1.67,1.78;', b';SR0.1,0.1;')
svg_data=hpgl.hpgl2svg(io.StringIO(hpgl_data.decode("utf-8")))
svg_data=svg_data.replace('stroke-width="14.000"', 'stroke-width="1.500"')
with open("output.svg", "w") as f: f.write(svg_data)
Some comments on this script:
- You need to download
python-hpgl,
and install it with "
python setup.py install",
which you must run as root.
- Of course, you need to edit my script and change the GPIB address to
match that of your instrument.
- The
bus.send_command(...) transmits four GPIB
commands—not ordinary SCPI
commands that are sent to the instrument, but single-byte
GPIB
commands which control the GPIB bus itself, and how devices
communicate over
it! The commands specify the spectrum analyzer to be the sole
"talker" device, and the host adapter to be the sole
"listener". These commands are sent to the GPIB
host adapter, immediately after the "PLOT" SCPI
command has been sent to the instrument. Immediately following
that, a low-level read is performed on the host adapter again, to
receive the data. The read command requires a maximum length
parameter—the value of 32000 is purely arbitrary and certainly
big enough, as the output typically seems to be about 12k bytes. One
of these commands causes an IOCTL error to be reported to stderr,
for whatever reason, but it seems harmless. (In the web server cgi-bin
version below, I used the _no_stderr() wrapper to get rid
of it.)
- I don't know whether the HP 8562B produces non-standard HPGL,
or if the various HPGL utilities I tested all interpret it wrong,
but I had to manually adjust the relative font size by changing the
"SR" HPGL command's arguments. Otherwise the result was
just awful. If you try this script with some other instrument, and it
produces either elephantine or minuscle fonts, look for the
"SR" command and its arguments in the raw HPGL, and
edit the script's
replace command to match!
- Finally, the python-hpgl library defaults to some very thick
lines in its SVG output, which I couldn't find a way to change, other than
by editing the "stroke-width" values in the raw SVG code
itself before saving.
- If you prefer some other format than SVG, you can go ahead and convert
it any way you like, but a way that I find convenient for manual use
is this: Call
the cgi-bin script (see below) from an img tag in a minimal html page.
Now, in your browser, right click and choose "Take screenshot"
and paste the bitmap anywhere you like. You can set suitable width and
height parameters in the img tag as well.
Perhaps this script is needlessly messy, and what is it with all the
imports I always end up needing??? They make all my Python scripts
terribly slow to start! Not that my spectrum analyzer is a fantastically
fast instrument either, and even the data transfer itself takes some
significant
time. I don't know whether this will work with any other instrument than
the HP 8562B, but if you find that it does, by all means, let me
know! :)
Integration with web server: Remote screenshots via web browser
To conveniently get the screenshots to my desktop PC, I installed a web
server on the Pi and enabled its cgi-bin functionality:
   apt-get install apache2
   a2enmod cgi
   systemctl restart apache2
I then modified the above three scripts to simply write the proper http
headers followed by the image file data to stdout. You can look
at or download these scripts:
I simply placed them
in my cgi-bin directory with the required execute permissions. That's
it—it really is that easy. Now I can point my desktop PC's web
browser to my Pi via http://10.42.47.23/cgi-bin/54501a.py
to obtain a screenshot from the HP 54501A for whatever use I like.
That URL can, of course, also be used inside an
<img src=...> tag. (And yes, there's absolutely no
error checking anywhere, so don't use these as-is on a production
web server!)
A web interface for direct SCPI commands
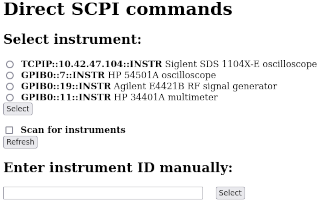
|
Finally, as a quick brush up on how cgi-bins and forms work, I wrote a web
interface to run arbitrary SCPI commands on any PyVISA instrument
(similar to the SCPI command interface offered on the web interface of
some modern instruments e.g. Siglent's oscilloscopes).
The script, direct_scpi.py, is
placed in the web server's cgi-bin directory. A text file
called "scpi.include" is placed in the same
directory, containing PyVISA resource names and optional comments, one
per line, for example:
TCPIP::10.42.47.104::INSTR Siglent SDS 1104X-E oscilloscope
GPIB0::7::INSTR HP 54501A oscilloscope
GPIB0::19::INSTR Agilent E4421B RF signal generator
GPIB0::11::INSTR HP 34401A multimeter
These instruments can then be selected from a list, or you can enable
"Scan for instruments" and hit "Refresh"
to also find any unlisted GPIB or USB/USBTMC instruments, as well as all
serial/RS232 ports (whether or not there's an instrument
connected)—but not Ethernet/VXI-11 instruments however. You can also
enter a valid resource ID manually. After selecting the instrument, enter
e.g. "*IDN?" as the query and hit Submit to see
what happens.
|
See above about installing the web server and
enabling cgi-bins. Note that all devices must have read-write permissions
for everyone, since the web server runs typically as
"nobody", "www-data" or some similar
unprivileged user. Note also, that for some reason PyVISA will hang when
executing list_resources() if none of the instruments
on the GPIB bus are switched on. I initially had the bus scanned for new
instruments automatically every time, but eventually had to add a checkbox
to enable scanning only when needed.
Some obvious notes:
I wrote these simple scripts for my own enjoyment, my own use, and for a bit
of exercise in Python, which I'm a complete newbie in. Please do not
assume these to be secure, sensible, safe, or even functional pieces
of code! Please do not use these in any mission critical application
without thoroughly checking what they do and adding necessary fail safes!
I use these in my home lab, and do not do anywhere near enough error
checking in them. Please do not place the cgi-bin versions on any
publicly accessible Internet-facing server! These most likely contain every
single kind of code injection vulnerability ever documented, and then some.
All the code on this page is in the public domain, free to use as you wish,
but whatever you do, don't blame me for what happens!
And sorry if my Python looks like I'm coding with my left foot—I said
I'm an absolute, complete, helpless newbie in Python! :)
Antti J. Niskanen <uuki@iki.fi>