|
The
Professional drill/grinder IBS/E (Proxxon No. 28 481)
is a very basic Dremel tool. I don't know what makes it so
"Professional" according to them. Proxxon offers similar
drills in cordless, 12V and AC variants; I chose the AC powered one.
You'll find its specs and plenty of reviews on the Net. Let me just say its
biggest drawback is the way that the grip to bit distance has been
minimized—which is a good thing for accurate work, but means only the
collets can be used to attach various bits! No, the chuck that Proxxon makes
will not fit this model of drill! With my previous Dremel
tool, the chuck was the only thing I ever
used! Yes, supposedly the collets offer more precise centering of the bit,
but they're just not as convenient, and they do not continuously cover
the entire thickness range—some oddball bits simply
cannot be tightened using the provided
collets! For example, to use a 2.5 mm drill bit (not even so oddball,
is it?), I had to use one of my old Dremel collets in the Proxxon! (It was
actually "compatible enough" and worked just fine. Good
thing I kept those parts when the Dremel itself broke down!) Hello,
Proxxon, any chance of making a chuck for this drill as well???
Or at least a gapless set of collets?????
Compared to my previous Dremel tool (an actual Dremel, that one was), this
Proxxon does have better torque at low speeds. The Dremel Professional
Model 398 (again with the Professional, do real
professionals actually use these toys?) had a tendency to
alternately seize up and burst to incredibly high RPM, especially when using
cut-off discs.
|

|
The MICROMOT
drill stand MB 200 (Proxxon No. 28 600) is
a very basic drill stand, and quite well made. It grabs the IBS/E
drill firmly, and after lubricating and tightening the dovetail feeds,
there is very little slop anywhere. The veritcal column is sturdy enough,
and although the tilt adjustment is a bit rough, it does lock securely
without play (and it's not something you turn during an actual milling
operation, so it does not need to be ultra smooth in its movement).
Only the depth scale is downright nasty. The moving indicator part is
plastic, its adjustment is absolutely not smooth, and it is difficult to
read. I guess I could make a better indicator if I actually found myself
using it much. But then I saw
this beautiful modification
by Kris Avonts, and decided to do something similar. A micrometer head
seems like overkill, but with an M6 threaded screw
I get the same 1 mm per revolution travel as the axes on
the compound table, with good enough resolution. See
this page for my version of the modification!
|

|
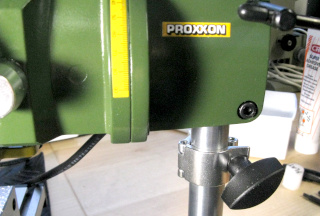
Pro tip:
I've found that a 20 mm clamp on the vertical column underneath
the actual drill holder thing is incredibly useful. It allows
rotating the entire drill holder from side to side while maintaining
its exact height, and can also be used as a safety stop of sorts. I use a
"half coupler", a Global Truss F14TA which I ordered
from Thomann. It fits the column
perfectly! (I use the same kind of clamp to attach a
USB microscope to the stand.) Replace its
M5 wing nut with a bigger clamping nut (e.g. a K&M No.
01-93-250-55) for even easier adjustment.
|

|
The MICRO
compound table KT 70 (Proxxon No. 27 100) is
absolutely tiny! (You can click to enlarge
the photo, if you can't see it.)
You don't realize just how tiny it is, until you hold it in the palm of
your hand! But that really shouldn't come as a great big surprise,
and it fits the drill stand like a glove!
It also benefits from tightening the feeds just a bit to remove some
excess slop. There are instructions on the Net to install proper bearings
on the axles, which I have not done yet. I don't see all that great a need
to do so either. There's also stepper motor kits available to make this into
a CNC machine. I have no need for CNC, but joystick control might be nice,
or simple constant speed feed without having to operate it by hand. Shouldn't
be too hard to DIY, but I'll just keep that in the back of my mind for
now...
|

|
Pro tip: Proxxon provides square nuts with their step clamps, vises
etc. to go into the table's grooves for tightening down the
accessory. I find them highly annoying, as they just don't want to enter the
groove from the end, and always try to turn sideways (corner first) instead.
Especially when the nut is on the underside of a big vise, and you can't
even see what you're doing with it, it can be a real pain to try to insert
into the groove. They also tend to stick and grab while sliding inside the
groove. Arrrgh!
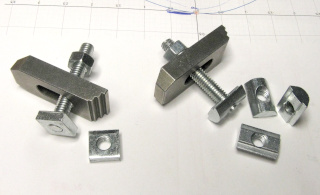
I found that there exist special nuts specifically designed
for assembling aluminum profiles (called, unsurprisingly, "profile
nuts" or "T-groove nuts"), available
for a variety of groove widths. Get a bunch of those, for a 6 mm groove,
with an M6 thread, for example FATH 96286, available e.g.
from TME.eu. They fit perfectly and, being more elongated,
they don't try to turn sideways when inserted! They are worlds better than
Proxxon's original ones in my opinion!
See the photo. On the
left are Proxxon's original square nuts, together with one step clamp that
came with the compound table. On the right are the better, more
elongated "profile nuts", one of them installed on an identical
step clamp. One side of the "profile nut" is rounded (its shape is
not important, as long as it fits in the groove),
the other has a square "ridge" in the
middle, 6 mm wide, which fits the 6 mm groove of the compound
table very, very nicely indeed.
|

|
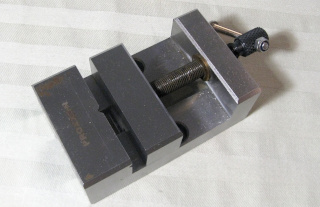
Proxxon advertizes their Machine vise MS 4 to go with the
MB 200 drill stand. I've finally seen one in real life, and it
didn't seem like any kind of precision thing, any more than it looked
like one in the photos. (Not "cheap and nasty" by any means,
just not a precision thing by a long shot. If an ordinary small vise is
all you need, it may be just fine.) Their
"Precision-milled steel machine vises" looked much
better from the get-go. The PM 40 is stated to be compatible with the
KT 70 compound table, but I chose the slightly bigger
PM 60 (Proxxon No. 24 255) instead. It is very nice, with
good tolerances, and very square in all directions. The tightening knob has
a hole in it, and a small steel rod is provided with the vise, but I attached
an M5 bolt of suitable length and a lock nut, so I don't need to hunt for
the loose rod all the time.
But what do you know,
its attachment screws (with the square nuts that go into the compound table's
grooves) are just a few millimeters too long! You can see where I
ground them into the groove's bottom in another photo
here. (They never did explicitly state
this vise to be compatible with the KT 70, but honestly, who would have
guessed!) Well, no real harm done, and I found better suited screws
immediately in shelf. Also I think
the PM 60's attachment to the table (using a screw driver from above)
may be infinitely more convenient than the PM 40's (tightening bolts
within the slots in its sides with a wrench). But note that the screws'
spacing differs from the spacing of the grooves in the compound table, so the
PM 60 can only be fitted in one orientation, with both its screws in
the same groove—I'm not sure if the PM 40 could go in either
orientation (probably not; the bolt spacing is 38 mm according to
this
CAD drawing, whereas the grooves are spaced at 25 mm multiples).
|

|
I also got myself the Eccentric clamping fixture ES 70 (Proxxon
No. 24 270), which is often more convenient than the vise, or
the step clamps included with the compound table. This was a very cheap
addition to the whole, and well worth its price. I keep the fixed stopper
(at the right in the photo)
permanently on the compound table, and attach the eccentric clamp itself
(the moving part, on the left) when needed. And yes, I replaced its
square nut with a better profile
nut faster than you can say "cat".
This clamp can even be used to grab the vise if I'm too lazy to properly
screw it down onto the table! Or if I want to orient it perpendicular to
its usual orientation...
Even without the actual eccentric clamp, its stopper fixture is often
extremely useful as-is, to accurately guide a work piece being cut with
a grinding wheel, or when used together with the simple step clamps! It is
easy to set precisely with an engineer's square, and will keep the work
piece nicely squared, which the step clamps alone will not do.
The handle on the actual clamp comes right off, I guess in order not to be
in the way all the time. I'd prefer it not to, and I wish it had a screw
thread at one end to lock it in place. The other end could be non-locking,
as it is now, to provide the best of both worlds. Or at the
very least, it could double as an Allen key for adjusting the position of
the clamp! Hello, Proxxon???
|

|
The Proxxon Dividing Head (Proxxon no. 24 264, but I
haven't been able to find any other model number for it???) is a
simple and relatively cheap attachment for the KT70 compound table. It has
three reversible jaws and a graduated rotation scale and a thumb screw for
locking it in position (rotating it while locked tightens or loosens the
jaws). Simple and stupid, really, but a good accessory if
you need to make anything round, or your n-sided shape of choice. It
doesn't have any worm gear drive or such for rotating the chuck, but it's
ok to rotate directly by hand in my opinion—though only in one
direction, as in the other it may start to loosen the jaws instead of
rotating the head as-is, even when not locked with the thumb screw!
It can even be mounted on its
side, so that the work piece is horizontal. And just so you know, the thumb
screw (for locking the rotation) does have a shaped block of metal
between itself and the surface of the actual rotating head, so feel free
to tighten it as firmly as you wish—the tip of the screw will not
gouge that surface. (Yes, I did take it apart, first thing!)
You can't really make it out, but a launch lug for a
supersonic model rocket is taking
shape here.
|

|
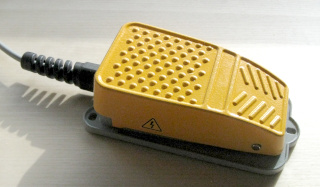
I wanted to get a foot switch as well, but I did not want to use it
exclusively—there are times when it's more convenient just to let
the drill run continuously. Proxxon does make their own
Footswitch
FS (Proxxon No. 28 700) which would do just fine,
except its outlet lead is very short. The drill's power cord is surely
long enough to reach down to the floor where the foot switch is (which
probably is the rationale for such a short outlet lead),
but connecting and disconnecting the drill would mean having to crawl
under my desk to do so. I'm sure I'd hit my head or hurt my back every
other time, and I'd need to learn yet another swear word or three.
So instead, I designed and built my own
footswitch with a desktop box
for switching between continuous and footswitch operation. It comprises a
generic PFS-135A foot switch, and a pair of illuminated rocker
switches in an electrical junction box, plus AC mains plug and socket
pigtails. Unlike Proxxon's, my footswitch uses a grounded Schuko plug and
sockets (but I'm still undecided whether that was a good design choice or
not). See this page for details.
|

|
I bought a cheap USB microscope
at an online auction, to bolt onto
the mini drill's stand and to use as an aid
in drilling circuit boards that I'd designed and etched myself.
Of course I would prefer a proper microscope that I could actually
look through, but my LZOS
MBS-9 stereo microscope is infinitely heavier than this plastic
toy, and would require an infinitely sturdier stand to hold it! I
can live with looking at the image on a computer screen. I have a
Raspberry Pi with a 24-inch monitor on the same desk anyway. And for
a cheap toy, the microscope's image quality is astonishingly good!
The stand that came with the microscope is absolute plastic rubbish,
though. Which is a shame, as its rack-and-pinion focus adjustment could have
been put into good use. Ultimately I attached the microscope to the drill
stand with standard mechanical components I ordered from
Thomann (yes, the musical supplies
store). See this page for more information
on the mechanical attachment, as well as the
software I run on the Raspberry
Pi to provide adjustable
crosshairs and other adjustments for the live microscope image.
|

|
And then there's the endless variety of accessories: drill bits, milling
bits, cutters, grinding stones, cut-off wheels, sanding drums and discs,
polishing things, brushes etc. Many are left-overs from my previous
Dremel tool, some came with the Proxxon, others I've actually bought for
some specific purpose. The way these things accumulate, I'm quite convinced
they multiply when left on their own unsupervised!
So do away with the silly holders that came with the Dremel tool or its
accessory kit; they'll fill up in no time flat! Get a couple of
fishing tackle boxes
with movable compartment walls instead. Those will also hold
the screwdrivers, Allen keys and wrenches you'll constantly need when working
with the
drill stand and compound table. I think mine are Plano ProLatch 3620
boxes—as if the brand really matters, but these have rather good
dividing walls which actually stay in place, unlike some I've seen.
The vise, step clamps, eccentric clamp, and a bunch of other accessories
e.g. an engineer's square, steel spacer blocks, extra profile
nuts and screws, and custom clamps, live in a couple of
refrigerator storage boxes.
Although the vise came in a handsome wooden box with a molded foam interior,
I found its lid stiff and difficult to open. Also, the sizeable box would
hold only the vise, and nothing else! These cheap plastic boxes will
hold other bits and pieces as well, and are much more convenient in all
respects. I bought a couple of them to contain the vise, the dividing head,
and various other accessories.
|

|
Since I don't have a proper dedicated workshop that I could freely make a
mess in, I made a DIY dust collection system, which
comprises a second hand vacuum cleaner, a plywood tub with a ring of
suction pipes (for really dusty work), and an "accordion hose"
attached to the drill stand (for less messy work). The vacuum cleaner's
hose is always within reach for a quick cleanup, and power is switched on
and off via a plug-in switch box, also within reach on my desk. See
this page for more details.
I rarely use the box, but it's still more convenient to get it out for use,
than it is to clean up all horizontal surfaces in my room afterwards.
The "accordion hose", on the other hand, is just perfect for most
work, and stays attached to the drill stand practically always.
|


