<HOME
<OH2GVB
Baofeng UV-3R notes
YES, YOU *CAN* DISABLE THE ALARM-FUNCTION ON THIS RADIO!!!
See the modification below.
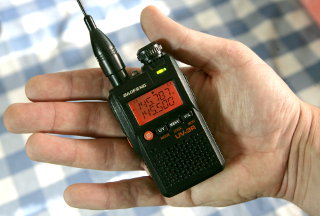
The Baofeng 2 m/70 cm dualband
radios UV-5R and the smaller UV-3R are extremely popular
in Finland, quite likely everywhere else too. As I write this, the
UV-3R is selling as "UV-3R Mark-II" and
"UV-3R Plus+" versions. The same model is occasionally
seen under other brand names also.
They are all pretty similar—the
Plus+ is ever so slightly clunkier than the Mark-II,
and has desktop charger contacts on the battery lid, whereas the
Mark-II has a charging port on its side. They are all available
in a variety of loud colors in addition to traditional black. I bought
my UV-3R solely because it is so cute and tiny, and I love
using it.
You can use third party Fuji NP-60 compatible batteries with this
radio. Just be sure to get the right battery—the Casio NP-60,
despite having the same model number, is a different thing and is
not compatible.
|
The original cute little UV-3R (the version with a one-line display)
was infamous for its unreasonably high 2nd harmonic on VHF, but there
is some confusion as to whether the problem persists in the Mark-II.
Apparently not, at least not in my radio, at least not on the ham bands. But
something odd happens around 160–170 MHz at low power, see
below.
So popular is this radio, that it is not uncommon to hear its "Alarm" sound
on the local repeaters, accidentally triggered by pressing and holding the
button right next to the PTT.
Unlike UV-5R, on the UV-3R this feature cannot
be disabled through the menu settings. Yes, I repeat, the radio
transmits its alarm sound if you press and hold the wrong button,
and there's no standard way of disabling it! But I
have disabled it on mine by this modification.
|
|
Like the Wouxun, it has no clear version
number anywhere (there's even no mention of "Mark-II" on the radio
itself), but here's some information that may (or may not) place it
in historical context:
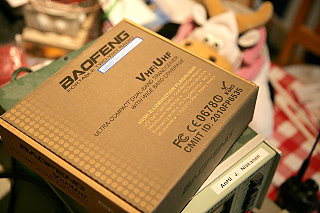
I purchased the radio from eBay (new, unused, from Hong Kong) in early 2013.
It was packaged in a plain brown box with black print and a "Mark-II"
sticker on the side. The serial number begins with "31204.....", the
frequency ranges marked on the unit are 400–470 MHz and
136–174 MHz. The manual boasts a "Perfect upgrade" (but not "DSP")
and documents all 19 menu items. It comes with a USB charging cable and a
slightly scary-looking USB-type charger. Inside the radio, the circuit board
reads "BF-3R-MAIN VER013 2011.11.23" (near the speaker contact springs).
I installed the battery and charged it (not with the included charger,
but from a powered USB hub). The general consensus on the Net
seems to be that it's better to charge the battery in the radio, than
to take it out and charge in the silly little cradle that's provided.
According to the manual, the TX/BUSY indicator LED should glow red,
then green, during charging. It doesn't. But there is
a battery icon on the LCD while charging is in progress, which disappears
when the battery is fully charged.
|
Incidentally, the battery icon on the UV-3R is much better than on the
Wouxun, which displays full bars almost all the
time, and then goes from three bars to two to one and to zero in quick
succession when the battery is almost dead. On the UV-3R,
the indicator is
quite reliable and useful: From full charge (4.1 V) it displays
three bars, dropping to two at 3.8 V, then one at 3.5 V
and finally zero at 3.2 V. On transmit, the radio will begin beeping
empty before zero bars, but still gives many minutes of TX time even with
a one bar indication. Also, like on the Wouxun, battery voltage is
displayed on power-up. And the battery life on the UV-3R is really
very good.
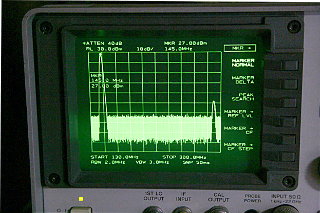
Harmonics on VHF
Once charged, I plugged the radio into my
spectrum analyzer
and measured the following 2nd harmonic levels at
VHF (relative to the carrier). I measured at both HIGH and LOW power.
(I couldn't measure actual output power,
since my analyzer isn't calibrated, and I ran out of attenuators and
thus couldn't use my milliwatt RF power meter either.)
|
|
2nd harmonic before modification |
After modification |
| MHz |
HIGH power |
LOW power |
Notes |
HIGH power |
LOW power |
136
140
145
150
160
170 |
-43 dBc
-45 dBc
-46 dBc
-46 dBc
-52 dBc
-50 dBc |
-46 dBc
-47 dBc
-49 dBc
-48 dBc
-29 dBc
-27 dBc |
(2 m ham band)
(WTF??)
(WTF???) |
-48 dBc
-51 dBc
-51 dBc
-48 dBc
-54 dBc
-51 dBc |
-52 dBc
-51 dBc
-50 dBc
-48 dBc
-29 dBc
-23 dBc |
|
That's not too bad. Certainly nothing like the -20 dBc harmonics
that were typical of the earlier version of the UV-3R. At higher power,
the harmonic suppression seems to improve further with increasing
frequency, but WTF happens at low power??? At 160 and 170 MHz,
not only does the harmonic suppression get worse, but the
absolute power of the 2nd harmonic actually
increased by some 20 dB
when power was decreased!!! Oh well, as long as the
ham band is well-behaved. I also checked harmonics at 70 cm.
No surprises there.
Since I was going inside the radio anyway, I did perform
the LPF mod also. Harmonic
suppression improved by a further 5 dB on 2 m (high power), as seen
in the above table. No effect on 70 cm.
Other modifications
In order not to accidentally transmit out of band, I set the frequency
limits using the UV-3R software (version 1.11) available
here. Apparently it installs and runs
just fine under Wine
in Linux, so you don't need that piece of shit by
Microsoft.
Also, Linux fully supports the Prolific chips used in the cheap
USB programming cables you get from eBay, which
Windows users are always
having trouble with. Once you've set the band limits, you can switch back
to using CHIRP.
To get 144–146 MHz VHF and
432–438 MHz UHF (which are the allowed frequency limits
in Finland), use a data line of
"4014601420438043" in the
.ini-file
of the UV-3R software, as per the explanation
here. To make Wine see the programming cable (which appears as a standard
USB serial port), see AA-1000 firmware
update.
 While I was inside the radio, I did the other usual modifications:
In earlier versions of the UV-3R,
RX audio was supposedly extremely loud.
I didn't think it was terribly loud on my Mark-II,
but the key beeps were.
After weighing the different alternatives, I settled on the
DD5XL audio modification (see page 19). If you want to do the
same, the diagram on the right will
help you identify the relevant components in relation to the
RDA 1846
chip. The gray rectangles are populated 0402 SMD components, the
white ones are unpopulated.
In summary, R10 is exchanged for 680k, 100 nF is installed at
C47, and 220k is installed at R46.
I highly recommend this modification, because
0402 SMD-components and such great fun to work
with. :) I had no trouble soldering
these by hand under my microscope.
To improve RF immunity with the headset or earphone, I added a
1 nF cap across the external PTT input. I used a 1206 SMD
chip, and placed it right at the connector.
Another major modification that I performed was to glue a thin sliver
of open-cell polyester foam inside the battery compartment lid.
This cuts down vibration induced in the lid at loud
volume. :)
And, of course, I did the following to disable the alarm function:
How to disable the Alarm function on the UV-3R
This is why I began crawling inside the radio in the first place.
One of the most annoying things in this radio is the "Alarm" function,
which raises hell on both AF and RF (yes, it actually transmits that
alarm sound, on the air!), and which is activated by pressing
and holding the button right next to the PTT.
Stupid or what? Well, it can
be disabled, but the fix is not as simple as changing a menu setting
(like on the UV-5R),
doing a software mod via the programming cable, or removing
a single resistor... But expensive it is not either.
It could of course be disabled simply
by disconnecting the button, but the same button
is also the "Alternate function" or "F" button needed for memory programming,
scanning etc. What needs to be disabled is pressing-and-holding it.
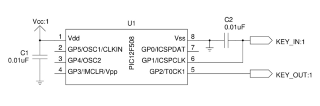
First I considered something simple based on an RC-network and a transistor or
two, but that would just not work: Looking at
the schematic,
all the keys are wired to a single pin on the
radio's microprocessor, through different valued resistors. Apparently
the microprocessor
measures the voltage to figure which key was pressed. An extra RC-network
would certainly mess things up.
|
So I hit the problem with a bigger hammer. I had a handful of surface-mount
PIC12F508 microcontrollers available, which work with the radio's
voltage range, consume hardly any power, contain internal oscillators and
pull-ups, and for which I already had a programmer. The plan? Isolate
the F/Alarm key from the radio, interface it to the PIC, and wire the
PIC to the radio to simulate the keypress. A simple assembly-language
program will de-bounce the key and command the radio with a SHORT keypress
regardless how long the physical key is actually held down.
The circuit
could hardly be simpler. Maybe even the
capacitors aren't needed, but they're good design practice especially
in an RF environment. Here
you can download the PIC firmware as gpasm
source code
or as a HEX-file.
|
|
After prototyping and debugging with a DIP-version of the PIC on a
breadboard, I programmed the SMD device, soldered the two SMD capacitors
onto it ugly-style, and wired it up to the radio. The offending key
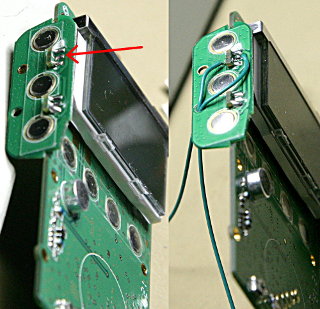
is on the small daughter board at the side of the main board,
and connects to the main board through
the middle solder blob in the upper one of the two groups of contacts,
as seen in
the photo.
Remove this solder blob, and attach two
wires—one onto the daughter board (coming from the key), one onto the
main board (going to the radio). The latter connection can be made on
either side of the board, since the traces are internally connected.
Glue the wires onto the daughterboard so they stay in place and don't
interfere with the keys. Connect these wires
to the PIC,
which can be superglued legs up wherever is convenient (there
are suitable component-free areas on the board). Finally
the PIC needs +V (I took this from the +V leg
of an IC near the positive battery contact) and GND (this is
readily available all over the board). The PIC is powered whenever the
battery is installed, but it consumes just microamps, since it spends
its time in sleep mode.
The result? It works. Accidentally pressing and holding the F/A-key only
switches the "F" alternate function on and off—no alarm! The "F"
alternate function works as always. Too bad pressing and holding the key
could not be assigned to do some more useful function—like going
into MONitor mode. But at least now I won't be accidentally polluting
the local repeaters with that annoying siren sound! :)
Also, after tackling the 0402 components in the DD5XL mod, I am now
officially no longer afraid of hand soldering SMD
components! :)))
Actually, you could also disable the alarm function
by hacking the
firmware. That's some hardcore stuff.
|
Of course, I take no responsibility for any damage that this or any other
modification may cause to your radio, your soldering iron, your fingers,
your cat, or anything else. Do this at your own risk. Or better yet,
don't do it. (But please don't annoy people on the repeater with that
horrid alarm sound either.) Do let me know how it turns out, though, if
you try this modification or something similar.
Antti J. Niskanen <uuki@iki.fi>
