|
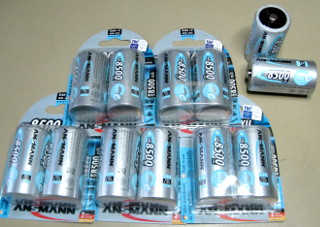
So after a few years' hiatus from portable ops, I finally decided to build
an external battery pack using low
self-discharge NiMH D cells made by Ansmann under the
brand name "Max-E". These cells provide
8 500 mAh of capacity (which I verified individually
before soldering them together, and they do come very, very close) and
have no problem with the 3 or 4 amps that the FT-897 maxes at
when transmitting SSB at 20 W output (the consumer D cell is rated
for 8.5 A continuous discharge according to the datasheet, the
industrial version much higher still).
They are sold in blister packs of two cells each, so six packs are needed
for the 11-cell (13.2 V) configuration used in the FNB-78, with one
cell left over. Since I'll be making another 11-cell pack also, that odd cell
won't go to waste.
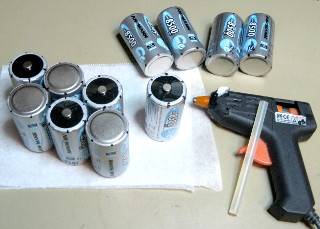
These 34 mm diameter cells do not, however, fit inside the battery
compartment of the FT-897, which is only some 26 mm high. Other
DIYers have fitted their
FT-897s with a new battery compartment
cover that extends outwards from the bottom, making room for the fatter
cells. I decided instead to forgo the convenience of internal batteries,
and make an external pack. After all, that could be used to power other
devices as well, so it also has its advantages. But I do sorely miss the
internal batteries... :(
|
|
After verifying their capacity,
I glued the cells together with hot glue, just to keep them in formation
while I solder them. One of the biggest limitations of hot glue is its
tendency to melt in high heat (well, duh), but I figured the cells should
not get really hot in my use (i.e. nowhere near the 120°C
that is often quoted as the melting temperature of hot glue, though it does
soften already much below that), and I'd be wrapping the whole thing in
heat-shrink tubing anyway (being careful not to melt the glue in the
process, and especially not to destroy the thermal fuse I
installed).
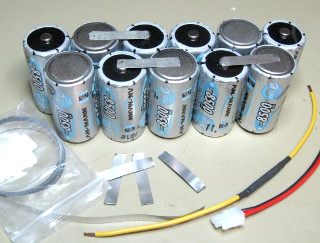
Hot glue is not 100% permanent (I consider that an advantage here),
i.e. they can be torn or cut apart after gluing, but regardless,
I did draw a diagram of the orientation of each cell, and how I
intend to connect the cells, the terminal wires, and the thermal fuse
together. I checked and re-checked this diagram before beginning the
assembly process, and checked and re-checked again
before gluing each cell. And I kept checking it while
soldering (see below), just to be sure. And hey, I got it right
the first time, so it all paid off! :)
|
|
Next I soldered the cells in series. For the interconnects, I used
8 mm wide nickel strip that I ordered from
eBay. With a touch of good quality
flux, I first pre-tinned both the battery terminals and the strip,
and then just melted them together. I used my 80 Watt
Weller WD-1000T
soldering station with a very wide 4.6 mm LT-D tip, set at a
rather high 380°C temperature, in order to melt the solder as fast as
possible. A lower temperature, a narrow tip, or an underpowered soldering
iron would require more heating time, actually allowing more heat to
flow into the cell. Heat
damages the cells very easily, and various sources on the Net tell you
not to solder to NiMH cells, but to use spot welding instead.
(In fact, that's the purpose this nickel strip is intended for, not soldering.)
A DIY spot welder should not be too difficult to make, but the videos I've
seen on Youtube don't really make it look all that gentle either. Anyway,
my cells survived soldering just fine.
For safety, I inserted a 72°C thermal fuse (the thing with the yellow
wires in the photo, enclosed in black heat shrink tube) in the space between
the middle three cells of the pack. It is only meant to break the circuit in
case the charger goes berserk and starts to overcharge the battery pack
for hours on end. I chose a 72°C fuse because that was the
lowest temperature available—it's still high enough to allow
charging the batteries with reasonable currents. I crimped the wires to the
fuse, enclosed it in heat-shrink tubing (which I shrunk only at the ends
to avoid damaging the fuse) and soldered the wires in series with the cells.
|
|
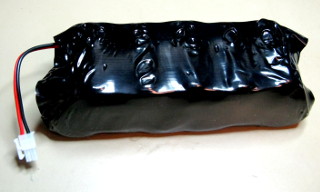
The 11-cell packs (I first made one for testing, then another identical one)
were enclosed in PVC heat-shrink tubing, which can be shrunk with an
ordinary hairdryer. (Many commercial battery packs as well as lithium
polymer batteries are enclosed in the same type of material.) Since it does
not require extreme heat to shrink, it is safe for the cells, as well as
the hot glue keeping them together, and the thermal fuse amidst the
cells. But it did turn out ugly as hell.
The battery packs' terminal wires were soldered directly to the cells,
and 2-pin Molex connectors were attached for good measure. I could just
as well have wired them directly to the rest of the circuit
(see below), but a connector seemed appropriate in case I need to remove
or replace a pack. I could have used
Powerpole
connectors here also, but somehow I never considered them for this kind of
internal connections. Damn. I did, of course, use Powerpoles for the
external connectors of the battery box, but there's really
no reason not to use them internally as well.
|
|
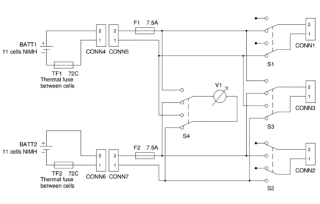
The two 11-cell battery packs are wired to three
Powerpole
connectors according to this wiring
diagram. Each battery has a dedicated connector with its
own on/off switch, and there is also a shared connector that can connect
to either battery via a third on/off/on 3-position switch. This allows:
- two packs to be used completely independently,
- one pack to be in use while the other is charging,
- two loads to be connected to a single pack without needing
a splitter cable, and
- immediate switching of the radio from one battery pack to
another with a single switch.
That last feature is the most important in practice, and does what the
"A/B" switch on the radio does for internal
batteries. A single returning (on)/off/(on) switch wired to a cheap
2-wire volt meter ordered from eBay allows checking the voltage of either
pack at any time (although the FT-897 also shows the battery voltage on its
display at all times).
All switches are two-pole,
so they isolate both the positive and negative side of the pack. In some
chargers, e.g. my
Bantam e-Station BC6-DC,
the negative output lead is not at ground potential, which would cause a
fuse to blow if the pack's negative side was grounded via the radio. The
two-pole switches mitigate that problem entirely. Also, they enable
connecting the packs in series, in case a 24 V portable supply is ever
needed. Finally, each battery pack has its own 7.5 A automotive-type
blade fuse. The fuses are held in a four fuse holder, which
leaves two unused slots to keep spare fuses in, which is nice.
|
|
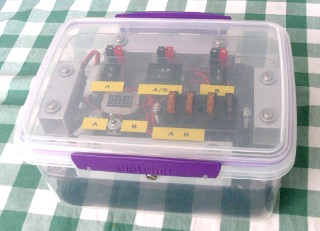
The packs are housed in a plastic food storage box with a lid that can
be locked in place. I fitted two horizontal dividing walls inside. The
upper one has all the connectors and switches installed on it (as
detailted in the schematic
above), while the lower one provides a smooth
surface against the battery packs, which are housed in the lower part
of the box.
The bodies of the connectors and switches, as well as all the wiring,
are in the space between the walls, which are separated by spacers made
of 25 mm square aluminum tubing. The original lid of the box
still fits on top for transport, in order to keep dirt out of the connectors
and to prevent the switches from turning on inadvertently.
The fuses are accessible with the lid open,
in case they need replacement.
The whole thing weighs about 4 kg (about the same as a 12 V
12 Ah lead-acid).
The box and the dividing walls are both translucent or transparent plastic
for no good reason, which makes all the uglyness inside visible to the whole
world. Whatever, as long as it works... Simply remove the lid, attach the
radio's power cable, flip a switch and start operating.
|
|
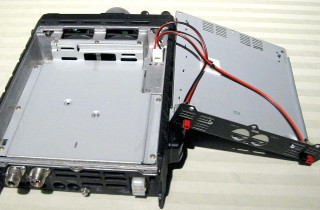
The FT-897 is designed to accommodate two internal battery packs, which
connect to two male 3-pole JST VH headers with 3.96 mm pitch
inside the radio (you can find compatible connectors on eBay—search
for "JST VH 3p 3.96"), and either one can be taken
into use with the "A/B" switch on the radio.
I wired both headers to separate Powerpole connectors which I mounted on
the back of the battery compartment cover with a makeshift arrangement
of aluminum profile, cable ties and hot glue.
Now I can connect my external battery pack to one, and another power
source (another battery, a car 12 V system, or an AC/DC adapter)
to the other, and select either one with the radio's
"A/B" switch.
The reason why I don't just wire the pack to the radio's external
13.8 VDC input is that when powered via the internal
connectors, the radio automatically limits its TX power to just
20 W, without needing to change the power setting through the menus.
And I definitely want the lower power when operating on batteries!
(Incidentally, the FT-857, which is like a smaller FT-897 without
provision for internal batteries, uses the extra pins on
its 13.8 VDC input connector to control its output power: if
pin 3 of the attached power supply cable is wired to GND, TX power
is automatically limited to 20 W. The FT-897 obviously does
not have this feature on its external power supply
connector, since there is physically no pin installed at the pin 3
position of the connector. Bummer.)
|
|
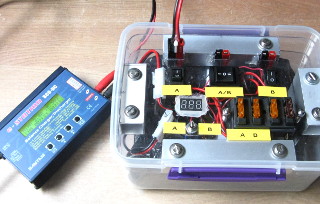
I use a
Bantam e-Station BC6-DC
to charge the batteries. It is a versatile multifunction charger that
can charge, discharge, balance and condition NiCd, NiMH, Li-ion, LiPo,
LiFe and SLA batteries of numerous cell counts at adjustable currents
up to 5 A. (The e-Station BC6 is the same thing with an internal
AC adapter, and the BC6-10 has a maximum charge current of 10 A;
otherwise I think they are the same.)
When charging NiMH batteries, it is advisable to
change the "NiMH Sensitivity D.Peak" setting in the
"USER SET PROGRAM" menu from "Default"
(8 mV/cell) to its minimum value of 5 mV/cell. Also, set
some reasonable values for "Capacity Cut-Off" (I use
10 000 mAh for this 8 500 mAh pack, and have
never had it cut off before completion) and maybe
"Safety timer" as well (at 2 A current I use
400 min, which is plenty).
For these 8 500 mAh cells even the
maximum current of the BC6-DC is less than 1C. The Ansmann Max-E
datasheet doesn't specify a
maximum charge current, but quotes charging times for
2.55 A (0.3C) and 4.25 A (0.5C) currents.
Since I'm usually not in a big hurry, I generally charge at just
2 A. That's about the same 0.25C that I like to use for my
2 000 mAh AA Eneloops when charging on my previous
TechnoLine/LaCrosse BC-900 charger (which eventually broke) or
my current SkyRC MC3000
charger. The AA Eneloops get hardly warm
at 500 mA current, whereas at 1000 mA they do heat up substantially
towards the end. Defaulting to only 500 mA, those have served me
for years on end. With any luck, and with
conservative charging, maybe these D-cell battery packs will as well. (But
with a single NiMH cell, the BC6-DC doesn't seem to reliably
detect the endpoint at 0.25C, and was inclined to overcharge—and
at the time I did not have my MC3000 yet. So while I
was testing the individual cells, I used 0.5C current i.e.
4 A, and the cells did become quite hot towards the end. Hot
enough to soften hot glue, in fact. But with the whole pack, the
BC6-DC terminates just fine at 2 A, and the pack hardly gets
warm at all.)
|
Of course, NiMH batteries should only be charged with a dedicated NiMH
charger. Don't try any other charger—not even your grandfather's old
RC hobby NiCd charger (although NiCd and NiMH have similar endpoint
detection, a NiCd charger is generally not sensitive enough to detect the
smaller negative delta V cutoff point of NiMH batteries). And never
charge any batteries unattended.
You have been warned.
 I liked operating portable with my FT-897
with its internal FNB-78
battery packs, but those NiMH packs did not work well in my infrequent
use. When they finally died, I installed
lithium polymer batteries in their place. They
worked wonderfully, but I may have had a bad batch of cells, because they
puffed up after a very short period of very light use. I was left wishing
for a perfect battery chemistry that would have low self-discharge,
high capacity, low internal resistance and better behavior than those
RC model LiPo cells.
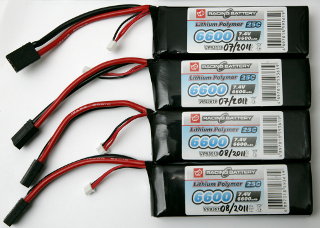
I liked operating portable with my FT-897
with its internal FNB-78
battery packs, but those NiMH packs did not work well in my infrequent
use. When they finally died, I installed
lithium polymer batteries in their place. They
worked wonderfully, but I may have had a bad batch of cells, because they
puffed up after a very short period of very light use. I was left wishing
for a perfect battery chemistry that would have low self-discharge,
high capacity, low internal resistance and better behavior than those
RC model LiPo cells.